Basic Chat Guide
Table of Contents [+]
Class: All Classes
Faction: All Factions
Level: All Levels
Item Links:
Quicklink (copy this):
Feedback: Please Login first
Faction: All Factions
Level: All Levels
Item Links:
Quicklink (copy this):
Feedback: Please Login first
⇑
Basic Chat GuideAnarchy Online sports one of the most intricate chat systems of any of the many MMOs I've played. This has both good and bad sides to it. The bad being that for newcomers to the game, getting a grip on how to set up chat windows to suit their own needs can be quite a task. This guide aims at remedying that!
Each of the many options available will be covered as well as features that might not be common knowledge. So sit back, relax and welcome into the wonderful world of Anarchy Online's chat system!
⇑
BasicsWhen first starting a new character, you will be faced with one simple-looking chat window:
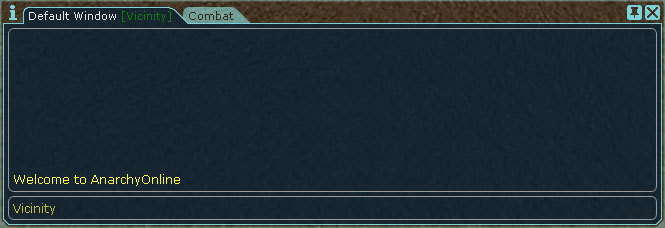
Doesn't look like it can do much. But beneath it's unremarkable appearance lies some extremely nice coding allowing for a lot of customizing and tweaking to fit all the information you might require into your GUI setup.
⇑
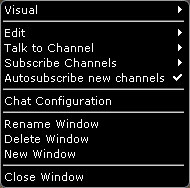
Chat Window Right-click MenuPerhaps the most obvious way to edit each seperate chat window is the use of the right-click menu, simply right click any window and you will be presented with a menu of various options:
| Right click Menu Options without Submenus | |
| Button | Description |
 | Hovering over this option will open a submenu listing all the public and private channels subscribed to that particular chat window, clicking on one of them will allow you to chat to that particular group. Alternatively you can press TAB in an active chat window, and the same list will appear. |
 | With this option enabled, every new channel will automatically be subscribed to this window. New channels become available when joining a new organization, when being invited to a private group or meeting the level requirements for certain channels (Such as the shopping channels.) |
 | Opens up the Chat Configuration window, which will be covered later in the guide. Alternatively you can press Shift+C to open this window. |
 | Allows you to give your chat window a new name. |
 | Fairly self explanatory, but this option basically deletes the chat window. |
 | Pops up a box asking you to name a new window. |
 | Closes the current window. If you should click this by mistake and be left without any chat windows open you can reopen chat windows via the Friends Window (CTRL+7) or the Chat Configuration Window (Shift+C) |
| Right click Menu Options with Submenus | ||
| Main Button | Sub Button | Description |
 |  | Allows you to switch between the "Borderless" and "Normal" look. The differences between the two is covered later in the guide. (Note: You are not allowed to turn "Tabbed" windows "Borderless". "Tabbed" windows are covered later in the guide.) |
 | When using 'Borderless' mode, this lets you choose how transparent the window is by default and when you have it selected. | |
 | Enabling this option shows a timestamp before each message in that particular window in the format of: (HH:MM) | |
 | Fairly self explanatory, this option toggles the text input bar at the bottom. Having it disabled can be particularly useful in windows that you don't need to interact with, such as damage spam windows, as it allows for more information for less space. | |
 | This option is similar to Disable Text Input, but instead of having it be either disabled or enabled this will automatically hide the input bar if you do not currently have the chat window selected. | |
 | With this option enabled the chat window will automatically fade messages away after a certain duration. More information on how to set this up can be found later in the guide. | |
 | Fairly obvious what this option does, it sets the chat window to always be behind any other windows placed over it. | |
 | As you probably already guessed, this option is identical to the last option just that it always puts the chat window in question on top. | |
 |  | Lists all public groups available. Left clicking on any of the ones listed either subscribes or unsubscribes them. Channel names displayed in red are not currently selectable, but they are in the list because at one point they were available. |
 | Lists all private groups available. Usually private groups are from so-called bots, but you can also be invited by other players to "their" private group. You can invite people as well by doing an /invite <playername>. Channel names displayed in red are not currently selectable, but they are in the list because at one point they were available. | |
 | Lists all the various combat spam channels, from your own damage to evaded hits and pets. As with public and private groups, simply left click a channel and it will be subscribed/unsubscribed from the window. | |
⇑
Friends Window Right-click MenuAn alternative to right-clicking on a window to edit various options is right-clicking the window's name in the Friends Window (CTRL+7)
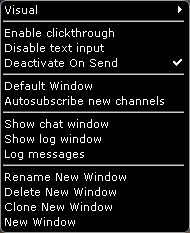
At first glance it might look identical to the menu we just covered, but it does contain a few additional options that can be useful!
| Friends Window Menu | |
| Button | Description |
 | In my opinion, one of the most useful options for combat spam windows. This basically allows you to click through the window, letting the window take up space but not getting in the way of looting, targetting, etc. Note that the option is not fully functional with "Normal" windows, but works great with "Borderless" windows. |
 | This option lets you choose which of your windows should be the default window. The default window can not be deleted, but beyond that has no major benefits over other windows. Note that you can only have one window classified as the "default window". |
 | Displays a resizable window showing the log from that particular window. Note that "Log Messages" has to be enabled for it to work. |
 | This option is essential for the previous option to work. Enabling this will allow you to log messages. |
 | Cloning a window makes an identical window with the same channels subscribed and the same size and options. |
⇑
Chat Configuration MenuA third way to edit the chat window is the Chat Configuration Menu, you can access this via the button in the other menus or by pressing Shift+C.
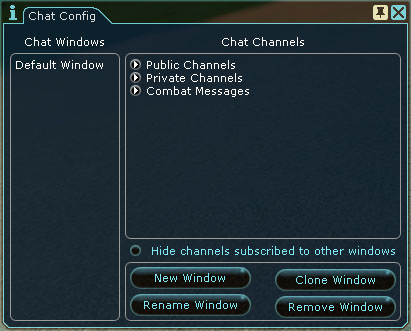
It does not contain the more advanced options, but it allows you to easily subscribe channels and create, clone or delete windows. You can also right-click the windows listed on the left-hand side for a few option such as if you want "Normal" or "Borderless" style or if the window should be logged.
⇑
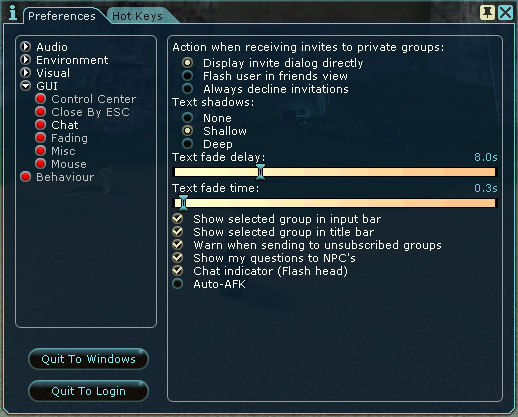
Chat OptionsIn addition to all the various options mentioned, there's a few more available via the Preferences. They can be accessed via the F10 button and then navigating to: GUI - Chat:
| Option | Description |
| Action when receiving invites to private groups: | Allows you to choose how the Anarchy Online client should respond when receiving a private group invite. Personally I would recommend to leave it as is by default; "Display invite dialog directly". |
| Test Shadows | Lets you decide how much, if any, shadow you want on your text. |
| Text fade delay | This option is connected to the "Time out messages" option available on any chat window. By dragging the bar you can decide how long delay you want before the text starts to fade away. |
| Text fade time | This option is connected to the "Time out messages" option available on any chat window. By dragging the bar you can decide how long time it takes for the text to fade once the previous option's time has been reached. |
| Show selected group in input bar | Enables or disables the name of the selected group being displayed in the input bars. |
| Show selected group in title bar | Enables or disables the name of the selected group being displayed in the tab. Only works for "Normal" styled chat window. |
| Warn when sending to unsubscribed groups | With this option enabled you are warned if you send a message to a group from a window you do not have subscribed in that particular window. |
| Chat Indicator (Flash Head) | If you have a "Normal" styled chat window with several tabs (getting several tabs is covered later in the guide) this options enables/disables the title bar turning red if a message is received in a tab that is not at the front. |
| Auto-AFK | By checking this option, your client will automatically set your character as "AFK" (Away from Keyboard) if no actions are taken, such as opening a backpack, moving around or chatting, in a time span of 3 minutes. If someone tries to send you a tell and you have been set as AFK, they will receive a notice that you are "Auto-AFK". You can also do this manually by typing /afk <optional reason for going AFK>, to turn off a manual AFK message simply type "/afk". |
⇑
Advanced⇑
Difference between "Normal" and "Borderless"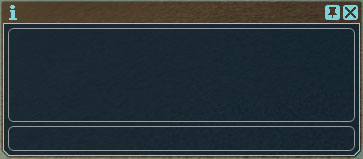 |  |
| Normal Style | Borderless Style |
| Can be resized. | Can't be resized, window's size must be fixed in Normal mode before turning it into "Borderless". |
| Can't edit the transparency. | Can edit the transparency. |
| Movable | When the window is turned into Borderless, it is locked to its position. |
| Can have several tabs of chat windows. | Can't have several tabs of chat windows. |
| Clickthrough doesn't work with Normal windows | Clickthrough works with Borderless windows. |
⇑
Chat TabsAs mentioned previously, Normal Styled chat windows can have "tabs" of windows. This is a feature that is not available from "Borderless" windows and that is a real space saver for those of us with a bit low resolutions. So how are you able to make use of this nifty function?
First of all, you need two windows. In my example I have named one chatwindow "New Window" and a second chatwindow "Another New Window":
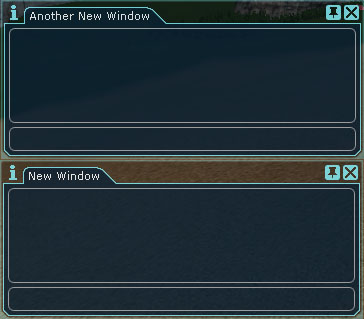
The first thing you need to do is hover your mouse over one of the tabs at the top:

Then right-click and the tab should be "attached" to your pointer:

Navigate your mouse pointer to the top of the chat window you wish to tab, and left click and the result should look something like this:

You can now change the tab that is focused by left clicking the appropriate tab and set up individually subscribed channels as described earlier in this guide. An alternative way of shifting through tabs and chat windows is by pressing ALT+Return or ALT+Shift+Return. As we mentioned above, you cannot make tabbed windows borderless. The "Borderless" option will be greyed out. You must separate the two tabs in order to make them borderless.
Last updated on 09.09.2012 by Llie
Originally written by Quilluck.
Additional help and proofreading by Ophiuchus
Do you have questions about this article or found an error? No comments yet - Please login first to post a comment.
Originally written by Quilluck.
Additional help and proofreading by Ophiuchus
Do you have questions about this article or found an error? No comments yet - Please login first to post a comment.
