Dark Ruins :: Team Guide
Table of Contents [+]
- 1. General Info on the Zone
- 2. Missions
- 2.1 Bring the Cult To An End
- 2.2 Release the Spirit Manifestation
- 2.3 A Goddess Recurring
- 3. Mobs
- 3.1 Valley Mobs
- 3.1.1 Notum Saturated Rafter
- 3.1.2 Climbing Creeper
- 3.1.3 Malah-Devi
- 3.2 Cultists
- 3.2.1 Returning Cultist
- 3.2.2 Vengeful Cultist Spirit
- 3.2.3 Spirit Manifestation
- 3.3 Spirit Valley Mobs
- 3.3.1 Misanthropic Creeper Spirit & Remorseful Malah Spirit
- 3.3.2 Melancholic Rafter Spirit
- 3.4 The Spirit Goddess
- 4. Loot
- 4.1 DOJA Chip
- 4.2 Notum Filled Gem Stone
- 4.3 SL Gems and Misc SL Loot
- 4.4 Spirit Mob Drops (Spirits, Spirit Siphons, Novictum & Ore)
- 4.5 Goddess Armour
- 5. Tactics and the Boss Fight
- 5.1 General Notes
- 5.2 In the Valley
- 5.3 The Spirit Goddess' Pattern
- 5.4 Your Group and Your Options for the Boss Fight
- 5.4.1 Calming
- 5.4.2 Add Pulling
- Index
- Index
- Index
- Index
- Index
Class: All Classes
Faction: All Factions
Level: 150-200
Item Links:
Quicklink (copy this):
Feedback: Please Login first
You killed off the cultists and the Spirit Goddess so now all is well, right? Of course it's not, where would the fun in that be? Welcome to team Dark Ruins, the revenge of the Spirit Goddess. Your old adversaries are back again with some new friends all of which bigger, badder and meaner than ever. Luckily this time you can bring some friends.Faction: All Factions
Level: 150-200
Item Links:
Quicklink (copy this):
Feedback: Please Login first
⇑
Index
1. General Info on the Zone
2. Missions2.1 Bring the Cult To An End2.2 Release the Spirit Manifestation2.3 A Goddess Recurring
3. Mobs3.1 Valley Mobs3.1.1 Notum Saturated Rafter3.1.2 Climbing Creeper3.1.3 Malah-Devi3.2 Cultists3.2.1 Returning Cultist3.2.2 Vengeful Cultist Spirit3.2.3 Spirit Manifestation3.3 Spirit Valley Mobs3.3.1 Misanthropic Creeper Spirit & Remorseful Malah Spirit3.3.2 Melancholic Rafter Spirit3.4 The Spirit Goddess
4. Loot4.1 DOJA Chip4.2 Notum Filled Gem Stone4.3 SL Gems and Misc SL Loot4.4 Spirit Mob Drops (Spirits, Spirit Siphons, Novictum & Ore)4.5 Goddess Armour
5. Tactics and the Boss Fight5.1 General Notes5.2 In the Valley5.3 The Spirit Goddess' Pattern5.4 Your Group and Your Options for the Boss Fight5.4.1 Calming5.4.2 Add Pulling
⇑
1. General Info on the Zone
The entrance is the same one you used to get into the solo version ( /waypoint 1695 535 4872 ). To get into an instance of the team version you'll need to be level 150-200, have completed the solo version of Dark Ruins and be in a team. Although unlike other team/raid instances you do not need to remain in a team to stay in the zone. Be aware though that if no one is inside for not even a minute you will lose that instance and need to start over with a new one.
⇑
2. Missions
When you enter talk to Jobe Investigator George and he will fill you in on what has happened since you cleared the solo version, give you three missions and an Energy Focus Disruptor. Each of these missions give a set base reward of 7 000 000 XP regardless of your level. Once you are level 200 that will translate to 7 000 SK but your current related faction level will influence how much of that 7 000 SK you will gain.
You need to be inside the zone when a mission is completed to get credit for it and after one of the missions is completed an eighteen hour lock out mission will appear. That prevents you from pulling any of these missions again and so long as that lockout mission is active after each of the remaining two missions are completed they will just disappear. You also can not pull any of the missions so long as any one of the three missions are active. So if you don't plan on completing them all, delete the rest.
If you delete a mission that will set another eighteen hour lock out mission on top of the other lock out mission you may have from completing others. Like when completing them the first mission you delete sets the deleted mission lockout for the rest you may delete so long as that lockout mission is active.

Jobe Investigator George
⇑
2.1 Bring the Cult To An EndThe cultists are still around and are apparently making use of a certain mushroom found in the zone (Joulie Mushroom). There are eleven set locations marked as blue dots on the map below where one of those mushrooms may be found. Although only two to six mushrooms will be found in each instance. Located at each of those mushrooms will usually be one or two Returning Cultists but I have seen as many as four at a single mushroom.
The added catch in all this is that while not aggressive they are social and in sneak mode so you may not be able to see them until you use the search action or they pop out to attack someone. Currently you need 450 perception or a little under that to spot them (used to need almost zero). Although if no one has enough perception you'll need to hit them with an AoE attack/taunt, set a pet to hunt or have another Returning Cultist or a Vengeful Cultist Spirit chase you near a mushroom as both are in the same social group.
A total of six Returning Cultists populate each instance and you will need to kill three of them to complete this mission.
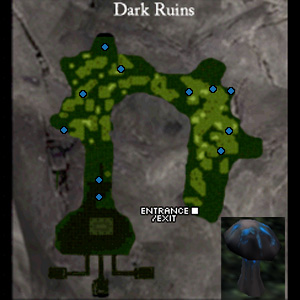
Joulie Mushroom map.
⇑
2.2 Release the Spirit ManifestationThis is where the Energy Focus Disruptor you got from Jobe Investigator George comes in which is used like the bottle from the solo version. The Spirit Goddess has three different groups of adds she can summon and the third type consists of four Vengeful Cultist Spirits and one Spirit Manifestation. Once someone in your team has targeted the Spirit Manifestation they will need to use the Energy Focus Disruptor on her to free her and complete the mission for the whole team. The range of the Energy Focus Disruptor is very long so it's best to take advantage of that.
One very important thing to take note of though is that if the Spirit Manifestation were to chase someone running out of the ruins area she will despawn on or just past the first set of stairs heading out. So you will need to take care of her quickly and while still inside the ruins area.

Stand at point X to avoid agg from the adds while selecting the Spirit Manifestation which can be any one of the five outer red dots.
⇑
2.3 A Goddess RecurringThis one is pretty straightforward, kill the Spirit Goddess.
⇑
3. Mobs
All the mobs in the zone are level 200 except for one level 180 Climbing Creeper near the start. I've split the mobs up into four groups based on their social groups. Take note that the damage info given are normal attacks against a level 200 character with about 8 000 in each AC and a 13% reflect shield. Do not take that info as absolutes and remember that crits can be up to multiple times higher in damage.
⇑
3.1 Valley MobsIf you plan on doing the boss fight you will want to kill all the valley mobs before attacking the Spirit Goddess. If you don't then when she summons the first set of adds each remaining valley mob will be warped to the ruins, turned into a spirit version of themselves and set loose on you. If there's too many of them the likely result will be you and your team mates reduced to a set of messy stains on the ruins floor.
⇑
3.1.1 Notum Saturated RafterOf the three valley mobs rafters seem to have the most health but the lowest AR and do the least damage (300-500). They do although have an annoying shield that while up will negate 99% of the damage you do and return 300 damage to the attacker. As in the solo version to disable that shield you will need to pull them on top of a pool which are marked as orange dots in the map below.
The shield can be a bit flakey so it'd be best to let the rafter settle down into place and wait a while before you toss in your weapon specials, perks, debuffs and so on in case the shield pops back up and to give the tank time to build agg. It can also pop back up should the rafter move even a little at times and changing agg targets can do that. So you do not want to move around or agg to bounce between team mates and pets, one person/pet should hold agg for each rafter. How you want to handle that should be discussed before hand.
⇑
3.1.2 Climbing CreeperCreepers seem to have the least health but the most AR of the three valley mobs and do about the same damage (400-700) as malahs.
⇑
3.1.3 Malah-DeviMalahs seem to be in the middle of rafters and creepers in regards of both health and AR doing about the same damage (400-700) as creepers. One added annoyance is the stun nano (Gaze of Loss) they can toss your way.
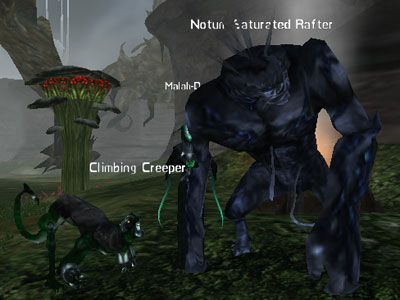 The valley mobs together. | 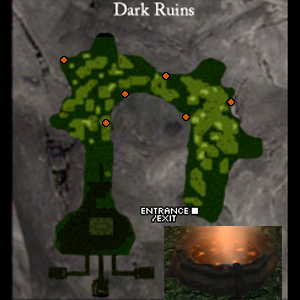 Novictum Pool map. |
⇑
3.2 Cultists⇑
3.2.1 Returning CultistTheir health and AR is fairly decent and damage range rather wide (200-1100). A group of them can be trouble so try not to agg too many at once. If you need to run and lose agg they will soon go back to sneak mode which can make finding them again a bit annoying.
⇑
3.2.2 Vengeful Cultist SpiritBasically the same as Returning Cultists in regards to health, AR and damage but have some painful extras. Their attack range is very long so trying to root/snare them off to the side while you deal with others doesn't work that well. On top of that they have a health and nano DoT (Banshee Wail) that will strip you of over 300 in each per hit. Fortunately if a trader were to hit them with both lines of drains, or at least the LE nanite drains, they don't seem able to use that DoT, a MP using nano shutdown should work too. Should you run and lose agg these mobs will just stop dead in their tracks and stay there.
⇑
3.2.3 Spirit ManifestationThese seem the same as Vengeful Cultist Spirits.
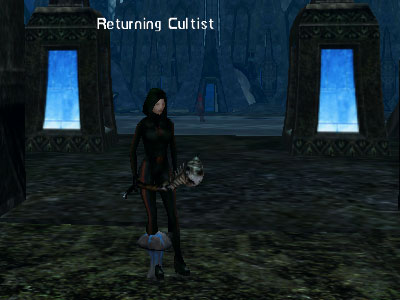
A Returning Cultist (check out who's in the background).
⇑
3.3 Spirit Valley MobsIf you run and lose agg from these guys they will then slowly make their way back to the Spirit Goddess and stand by her.
⇑
3.3.1 Misanthropic Creeper Spirit & Remorseful Malah SpiritBoth seem to have more health and about the same or more AR as their regular valley versions and do about the same damage as well (400-700). Remorseful Malah Spirits can use the same stun nano (Gaze of Loss) as their regular valley version.
⇑
3.3.2 Melancholic Rafter SpiritThankfully these ones don't have that annoying shield to worry about. Unfortunately they seem to have more health and perhaps more AR than their regular valley version plus hit like a freight train (700-1500). If a crat can charm these they should make for a great pet.
⇑
3.4 The Spirit Goddess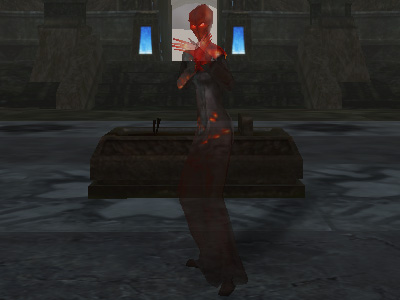
The Spirit Goddess, again.
In regards to direct combat abilities the Spirit Goddess is rather weak for a boss with seemingly only moderate AR and mediocre damage (100-700). She although does have tons of health, a long agg range and some annoying tricks up her tattered sleeves.
- Warping & Rooting You: While she has agg on someone she will randomly pick anyone on her hate list and if they are outside of a certain range from her warp them to her location and hit them with a short root. Once you're on her hate list you're on it till she breaks agg. Then you can get on her hate list by hitting her with some sort of attack/drain/debuff yourself or with pets, healing someone nearby her, just being too close or leaving a heal pet on someone attacking her.
- Warping: She does not run or walk around but will move from place to place based on her cycle by way of warping to each spot.
- Reflect Shield: Once she warps from her initial location and at least immediately after returning to that spot she can toss up a ten second reflect shield (Shield of Deadly Power) that will negate all of your physical damage and hit you for 100 damage per attack. She casts this often but it can be interrupted with melee attacks. It would be best to hold your weapon specials and perks till right after it goes down or is interrupted to avoid wasting your attacks.
- Summoning Adds: She has three sets of adds she can summon. The first consists of one spirit version of each of the three valley mobs. On top of that she will quickly summon any remaining valley mobs and turn them into spirit versions. Her next set is five Vengeful Cultist Spirits. The third is four Vengeful Cultist Spirits and one Spirit Manifestation.
There are two very important points to remember about fighting the Spirit Goddess. First, after she aggs someone she will begin her cycle of warping around and spawning adds with or without anyone attacking her. Due to that once you start the attack you need to keep going and everyone in the team needs to stay alive.
The next point is that with or without agg on anyone she never recovers any health on her own nor are there any mobs or devices that will heal her. That small but important detail opens up various options as to how you can deal with her and the type of profs that can take her down with others or alone.
⇑
4. Loot
Ignoring the one level 180 mob the QL range on drops is 150-250. Then the only nodrop item from this zone is the DOJA chip.
⇑
4.1 DOJA ChipOnly the three types of regular valley mobs will drop these but the drop rate is high enough that you will likely see some 10-15 DOJA chips drop. Check out our guide on DOJA chips for more info on these items. The team Dark Ruins DOJA chip is special as not being on the same lockout as the other DOJA chips you can turn in one of these and one of the others in your level range at the same time.
⇑
4.2 Notum Filled Gem StoneThese drop from any mob other than Returning Cultists but the drop rate is not high. Currently they apparently have no function other than being sold to a shop terminal for cash. If you cut them with a Jensen Gem Cutter (1000 Mechanical Engineering) their value goes up and if a cut one is sold to a trader shop with about 2.2k computer literacy they will fetch a bit over 650 000 credits.
⇑
4.3 SL Gems and Misc SL LootThe typical stuff you see SL mobs drop which can include the odd pearl too.
⇑
4.4 Spirit Mob Drops (Spirits, Spirit Siphons, Novictum & Ore)All of the Spirit Goddess' summoned adds are classed as spirit mobs so can drop these items. QL 150-240 spirits are common enough although if you're really lucky you may get a QL 250 spirit to drop. QL 250 spirits are very rare here as I've had hundreds of spirits drop and only got two or three QL 250 ones.
⇑
4.5 Goddess ArmourThis is basically upgraded predator armour with changes to the special bonus on each part and higher wear requirements (level 150, 500 sense and 500 agility). The Spirit Goddess will usually drop two random parts but sometimes drops three and on the rare occasion four parts.
| In Game Picture | Armor Set | Statistics | ||||
 |  | ACs Projectile Melee Energy Chemical Radiation Cold Poison Fire Abilities Max health Max nano Miscellaneous Nano cost XP modifier Crit chance AAO | 3150 3150 3150 3150 3150 3150 2700 3150 875 875 -4 3 1 15 | Speed Melee init Ranged init Physical init Nano init Duck Dodge Evade Nano res Damage Add Projectile Melee Energy Chemical Radiation Cold Fire Poison Other Crit decrease Nano damage | 70 70 70 70 105 105 105 70 10 10 10 10 10 10 10 10 1 1 | |
⇑
5. Tactics and the Boss Fight
⇑
5.1 General NotesIt's important to work together and talk amongst yourselves as to how you'll do things so people know what to do then follow through. People shouldn't be too anxious to toss in debuffs, drains, attacks, heals and so forth when there's other mobs around and mobs are being pulled to the group. This can end up getting the attention of even more mobs or shift agg making the situation worse. Squishy people should try to stay well back and no one should be afraid to run if things go bad. Running and losing agg if you have too many on your tail so you can regroup is far better than getting killed since you lose your instance if everyone dies. Most of this applies to other team situations, not just here.
⇑
5.2 In the ValleyOnce you get into the area with rafters it's a good idea have your puller bring the mobs to the nearest pool where the others are waiting. Clear everything around a pool out then move on to another pool. If you happen to have a number of people and more than one capable tank you may want to split the team up into sub groups while remaining in a single team. This should limit how often rafters swap agg between team mates and speed things along. If you do that each sub group should take a different pool.
Be sure to kill off all the valley mobs and the six Returning Cultists before going after the Spirit Goddess. Leaving any of them alive, especially the valley mobs, just makes things harder for you later.
⇑
5.3 The Spirit Goddess' PatternYou'll find her standing in the middle of the ruins waiting. Once she aggs someone she will eventually warp to the doorway of one of the back rooms then to that back room a brief moment later. From there she will in time warp back to the middle of the ruins and spawn her adds. Try to stick to that pattern and follow her to the back rooms as if you deviate from that pattern it can cause her to deviate from hers which generally makes life harder for you.
This pattern is both time and damage based. If you left her alone after the cycle begins she will continue on it. If you do enough damage to her it gets her to warp from place to place more quickly and means you'll only get one of each of the three spawn groups to deal with. If your damage is low or she's left alone then every other spawn group can be the valley mobs group.
When fighting her in the third room it would be a good idea to stand at the door as pictured below. This will make swinging around to head out in a hurry easier so you're in position to tag the Spirit Manifestation before she is spawned which usually happens on the third wave.

The numbers indicate the order she follows when going to back rooms. Red dots indicate where the adds are spawned with the one just above the bottom row of three being the Spirit Goddess herself.
R = Melancholic Rafter Spirit (spawned first)
C = Misanthropic Creeper Spirit (spawned second)
M = Remorseful Malah Spirit (spawned third)
⇑
5.4 Your Group and Your Options for the Boss FightYou will need at least one person in the team that can survive being attacked by a group of her spawned adds at once for a while or at least one person that can calm her spawned adds reliably. Other ways of dealing with this fight exist but I'm just listing what would likely be the two safest ones. People often like to try to tough their way through things but taking a bit more time and care should keep everyone alive and allow you to do things more smoothly. This zone is more about the XP/SK rewards than the loot so keeping everyone alive so they get those rewards is important.
⇑
5.4.1 CalmingNote: Admittedly I haven't had the chance to test this one out so can't attest to how well it will work or how readily all the adds can be calmed.
When the Spirit Goddess spawns her adds they don't come all at once but one at a time with a short pause between them and in a set order. So long as your calmer is quick and can calm the mobs on the first try much more often than not then this will be easy. Refer the the map in the above image to see where they will show up and be ready for them. With the adds safely calmed your team can focus their efforts on just the Spirit Goddess.
The calmer although does need to keep an eye on when the calms will end refreshing them before hand. People will also have to refrain from using AoE attacks/taunts. Once the Spirit Goddess is dead you can then either leave or finish off the adds. The whole fight when done this way with some decent damage will likely take about ten to fifteen minutes.
⇑
5.4.2 Add PullingIn this one you first need to split the group up between those that can take a pounding and those that can't. Those that can't will go to the spot marked as A in the map segment below while those that can will head in to fight the Spirit Goddess. When she spawns her adds those that went in to fight need to run out and join those outside at point A. Unless there are any DoTs still on the Spirit Goddess once they get there she should break agg on everyone and they'll generally lose agg on most of the adds as well.
So long as the team can handle the adds that came out fight them around point A. If too many came out and no one has any crowd control nanos everyone needs to run to lose some agg. Those that can't take a pounding especially need to run as they can always be called back later and everyone needs to stay alive. Losing agg really is best as a one person job since too many people trying to do that in a small area doesn't work well. There are a lot of obstacles and small hills so it shouldn't take too long for that person to lose a bit of agg and bring the rest over to the others.
Once the adds that came out are dead and if there are some left everyone should go to point B as shown below. One person will then pull some adds back to point B but again if too many come be ready to run. When pulling spirit valley mobs if you use the long general taunt (Enmity, 35m range) from just barely in range and run back quickly only one mob should be pulled in most cases. With Vengeful Cultist Spirits they will generally be gathered up just inside the ruins past or on the stairs. For them pull by hopping up and edging forward starting around point B.
When the adds from a wave are dead we begin the cycle again with squishy people waiting at point A and the rest going in. On the wave with the Spirit Manifestation (usually the third one) remember that it can't be allowed to chase someone out of the ruins or it will despawn. So only those that can really take a pounding for a while should go in that time with all of them trying to use the Energy Focus Disruptor on her quickly. Once that's done then head back to point A as usual.
After the wave with the Spirit Manifestation the Spirit Goddess should go down in the next attack cycle without even warping back so everyone can come along. The whole fight should take about fifteen to twenty-five minutes with some good damage.
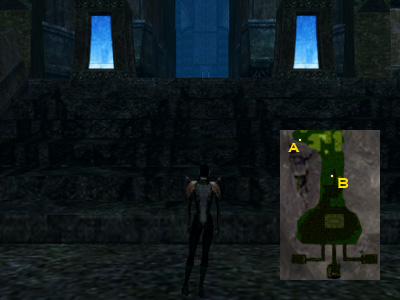
Standing at point B.
Last updated on 11.23.2010 by AnotherPhoenix
Written and researched by AnotherPhoenix.
Do you have questions about this article or found an error? No comments yet - Please login first to post a comment.
Written and researched by AnotherPhoenix.
Do you have questions about this article or found an error? No comments yet - Please login first to post a comment.
