Arete Landing
Table of Contents [+]
- Arete Landing-Starting Area
- Arete Landing
- Arete Landing
- Let's Get Started!
- Inventory and Items
- Information Windows
- MAIN STORY MISSIONS
- 1. Rex Larsson
- 2. Marcus Stone
- Gas Fires
- Wounded Workers
- 3.Flink Novak
- 4. Alex Gibbs
- 4a. Alex Gibbs and Personalized Basic Robot Brain
- Patrick Sun and Insurance Terminals
- 5. Stanley Goodman
- 6. Marco Spida
- 7.Sarah Greene
- 8.Vernon Godfray
- 9. Sheila Black or Doctor Mason
- 9a. Lady Sheila Black (SHADES ONLY)
- 9b. Doctor Mason
- 10. Lorelei
- 11. Vaughn Hammond (LEAVING ARETE)
- 11a. The Quick Way
- 11b. The Story Way
- SIDE QUESTS
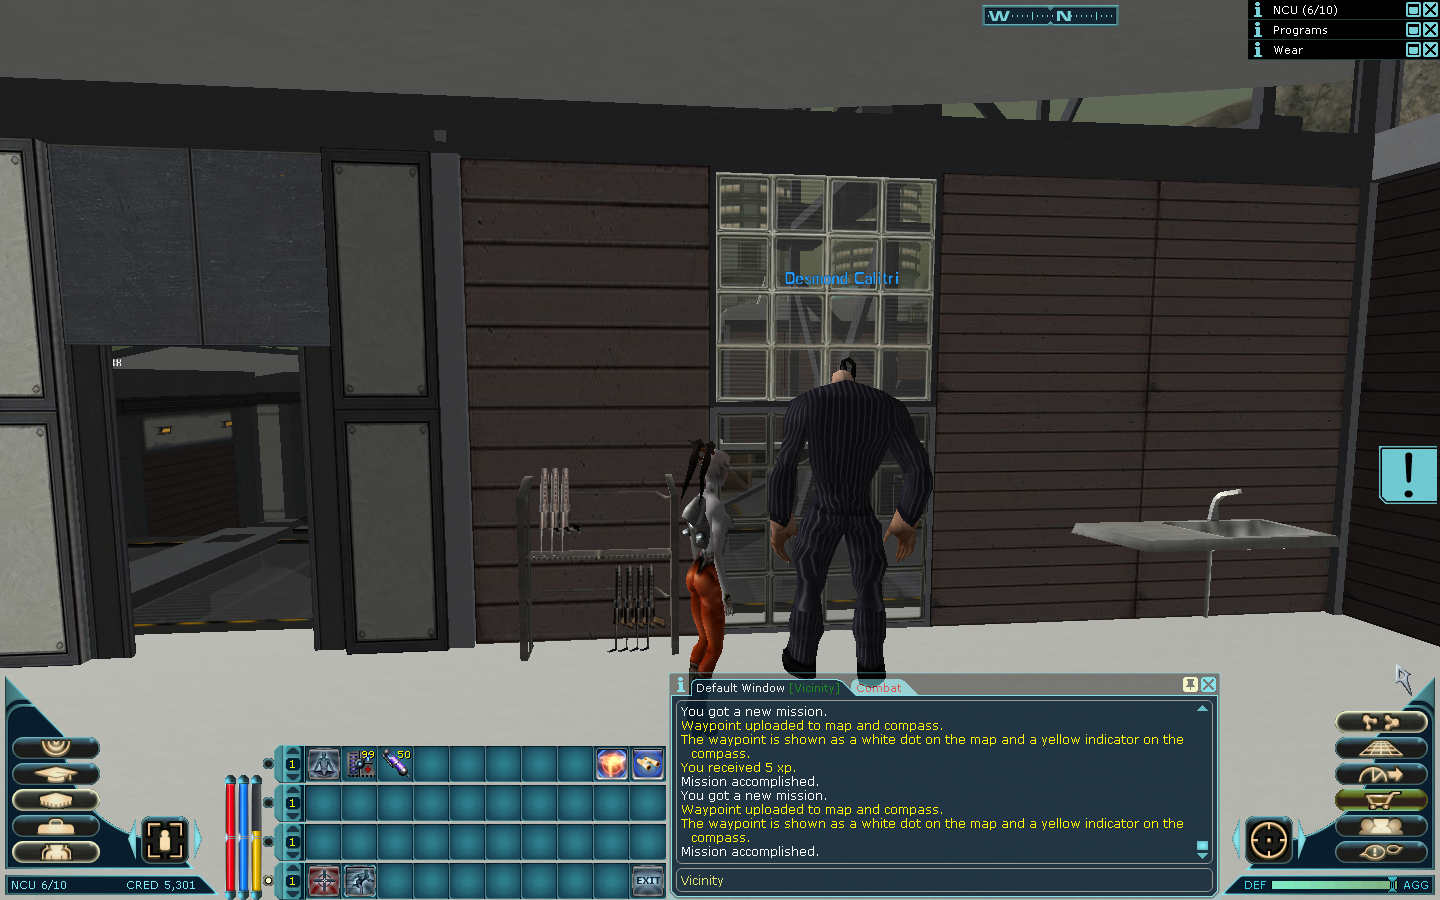
- 12. Desmond Calitri - Kill the Protestors
- 13. Antonio Stacklund and Upgrading Weapons
- 14. Remi Gallois
- 15. PvP Arena
- 16. The Shiny Sword and The Leet King
- 17. The Shady Guy
- 17. Emiel Dijkman
- 18. The Credit Card
- 19. The Alien Ship
- 20. Choosing a Faction
- 21. Janos - A Special Delivery
- MISCELLANEOUS
- 22. Vending Terminals and NPC Shops
- 23. Some Strange Items You Can Loot
Class: All Classes
Faction: All Factions
Level: 1-30
Item Links:
Quicklink (copy this):
Feedback: Feedback-Thread
Faction: All Factions
Level: 1-30
Item Links:
Quicklink (copy this):
Feedback: Feedback-Thread
⇑
Arete Landing-Starting AreaAs some of you may or may not know, Patch Update 18.7 which was released on April 21, 2015 created a new start area for Anarchy Online. All other "start areas" were officially closed after this patch dropped.
There have been quite a number of nano and professional changes to the classes, so if you are a returning player you may want to click on the link for the Patch, above (it will take you directly to the 18.7 patch notes) so you can see the changes to whatever class you are interested in.
- NOTE: If this is your first time playing Anarchy Online (AO), you may want to take a few minutes and read over some of our more general information guides before you start.
Be sure to check out the information regarding the basic Gui that automatically loads which you can find here: Basic GUI Guide to learn more about all of the GUI elements.
You should also visit our guide on WayPoints, something you will encounter in many of our guides. Waypoints help you to locate items, NPCs, and general locations.
Another guide of interest to you as a new or returning player should be Improvement Points. This guide will help you understand how to raise your Improvement Points (IP) to increase valuable skills needed to reflect needed skills for your character.
⇑
Arete Landing⇑
Arete Landing is where all players start out on Anarchy Online. This area is separate from the main portion of the game and is intended as a learning area where players can get a feel for the game. While this area offers a small taste of much of Anarchy Online's gameplay with its varied missions and quests, you do not need to complete most of them to head to mainland Rubi-Ka and start your adventures there. 
Arete Landing Map - Thumbnail
NOTE: If you want to skip most of the action on Arete Landing for whatever reason, and head straight to Rubi-Ka's mainland, you will need to bribe a certain ICC Peackeeper who guards the door to ICC HQ and Mainland Rubi-Ka. Hammond will expect 15K in credit from you to let you shirk your duty on Arete. To learn more about who to speak with, start by jumping down in the guide to Vaughn Hammond.
If you do not have the 15K already, and you want to get it quickly, you have a choice to make. Jump to The Credit Card
WARNING: Skipping Arete is NOT advised for first-time, or returning players who may need a refresher. There are a number of items that you can obtain here that will be very useful to you as you continue your adventures on mainland Rubi-Ka and beyond!
⇑
Let's Get Started!So, first, you need to make a character to play. If you haven't yet created one, use the following guide to learn more about that: Create A Character. Once you get through the character selection menus, you are transported to Areta Landing, where everyone starts off in Anarchy Online.
It has been suggested that for a very new player, Adventurer or Martial Artist are quite easy to learn and get used to the game with (my first character was an Adventurer). I also won't go over what's the best race, etc, as I feel that is a personal choice.
WARNING: I found this out the hard way, but do not join the Omni-Tek or Clan before you are ready to leave Arete Landing. It will remove you from the Neutral chat channel (Neu. Newbie OOC) - the default chat channel when you start the game. Neu. Newbie OOC can give you a lot of help and let you ask questions as pretty much everyone is in that channel at the get-go. Also, at level 31, you'll be removed from the Neu. Newbie OOC channel. Silly, but you still have /shout and /vicinity to ask questions and look for help.
NOTE: Can't see your friend? They're probably in a different instance (called a Group Selector). To see which you are in, press Shift+F9. Look for where it says 'GS=#'. If you are all not seeing the same number after "GS", you can fix this by having the whole team enter the ship door that you see when you first log into the game. Just step on the blue circle there to be transported inside the ship.
Alternately, if you are already deep into Arete, you can also enter the Alien Ship at the other end of the playfield to be in the same area.
Once you get your character set up, take a look around. There are a number of things that may be of interest, so we'll go over them.
⇑
Inventory and ItemsOne of the most frustrating yet unrealized, (until it is too late) headaches that can happen to a player is losing items in Overflow.
What is Overflow you ask?
Well, to answer that, let's start by taking a look at our guide on Inventory, Bank, Backpacks and Overflow to learn what it is, how to deal with it, and other important aspects of your inventory and stored items. If you're new to game, or returning you should definitely take a quick read of this guide!
Hopefully, you never need it, but it's good info to have. So, now that you have an understanding of how the game handles item storage and item storage overflow, let's move on and take a look in your regular Inventory window. (Click the "I" shortcut on your keyboard to open Inventory).

Once you open your Inventory (if it isn't already), in addition to Profession/Class based weapon(s) and nano(s) you'll find you have some other items:
| 50 | 25 | (Computer Literacy needs to be 20 before you can wear it) |
(wear on your back, and you can Right Click on it to give you more Inventory space) |
- You can Left click on the Health and Nano items and drag them to place them on your hotbar (you target yourself or another person, then Right Click on the health item to use) if you wish.
- The Health and Nano Recharger can be used when you are sitting on the ground [X] and not engaged in combat. Simply select yourself or an ally and right-click the recharger.
- The Health and Nano Stim can be used in combat, but it has a smaller effect and a longer cool-down than the recharger.
Where you have war and conflict you will always have a need for weapons, gear and armor.
- To wear your items and weapons, you need to go into the Wear tab (bottom tab on the left-hand bars or Ctrl+1) and either Right Click on the weapon or item (works on most items but not all so you may need to use the L-click button on your mouse to pick them up and place them in the correct tab and/or slot.
- There is a tab for Weapons, Clothing/Armor, Implants, and Social/Clothing.
- By Shift + Left Clicking on an item in your inventory, it will show you an info window about that item.
An added bonus to a planet rich in Notum are the numerous Nano Crystals to aid in your survival! (While a number of Nano Crystals are for general use, more are often profession-specific, so read them carefully before buying any).
- When you Right Click on the Nanos you have, it will bring up the Programs (fourth tab on left bar or Ctrl+8) with different category tabs. By Left Clicking and holding, you can drag the Nano icon to your hotbar to use. Targeting yourself or another person, then Right Clicking on the Nano icon will 'cast' the program.
In a world fueled by conflict and war, it is common that you or an ally will possibly be badly injured. There are a few methods that can be used to heal yourself and your allies.
⇑
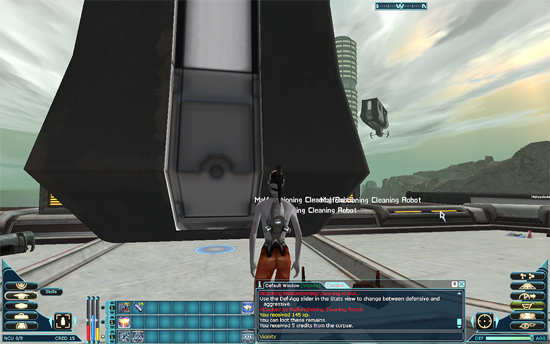
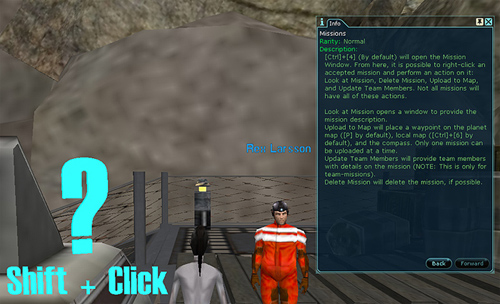
Information WindowsOnce you get your inventory and items situated and head over to the first Non-Player Charater (NPC), you'll notice two things right away in the area around you: A blue question mark (?) and an NPC with the name Rex Larsson (in blue).
NOTE: Any NPC you see with a BLUE name is related to a mission in some way, by either giving a mission and/or item or being a step in a mission line of some sort.
Holding Shift and Left-clicking on the question mark will show you a small Information (Info) window about the mission or object associated with it. In this case, it's a Mission. While these are found throughout the game, as a starting player, these may be most useful to you here on Arete! To close this window, click the X in the upper right corner of the Info window.
⇑
MAIN STORY MISSIONS⇑
1. Rex Larsson - 3624.5x787.8
Overview
Step 1: Terminate 5 Malfunctioning Cleaning Robots.
Step 2: Open the Cargo Box.
Step 3: Return to Rex Larsson. Reward: 1040 credits; (up to) 1281 xp.
Note: In this, and the following sections you will notice a brief overview and "Reveal" after it. This just helps us keep longer guides neat and tidy! Click [Reveal] to open up a more detailed walkthrough for each section!
[Reveal] Walkthrough
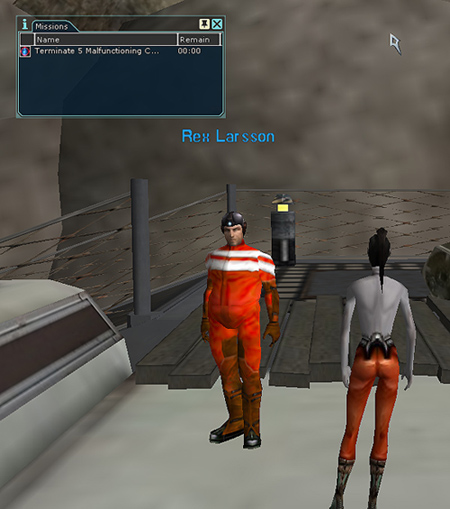
Now it's time to speak to Rex by Right-clicking on him. Follow through his dialog and answer him and he will then give you your first mission. Once Lex tells you Goodbye, it's time to start your first task!
If you look in your Mission window (you can press the Missions bar on the right side tabs or Ctrl+4) it says we need to Terminate 5 Malfunctioning Cleaning Robots (Level 1). You can also click on the mission itself in the Mission window for an information window that you can toggle on and off, which will give you even more detail about the mission (I highly suggest doing that).
Mission Window
If you look around, you will see the Malfunctioning Cleaning Bots. By Left Clicking on the creature (also known as a mob) you will see their name in a bar at the top of your UI (might have to move things around to see it) as well as in a window by your right UI bars.

You will notice a few things about the bars identifying the mob you have targeted.
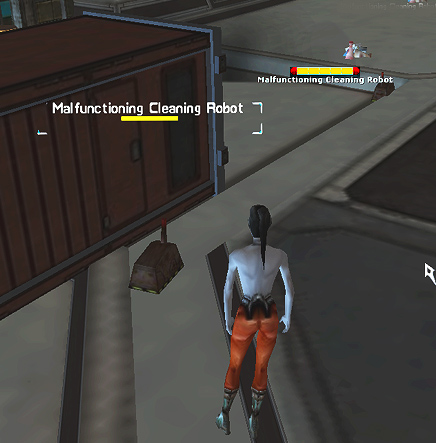
- You will notice two bars. One is adjustable and may be moved anywhere in your play window, and one that is stationary just above the mob you are targeting. These bars help you to monitor what you are attacking as well as it's actual visual location.
- On the adjustable bar, you will notice either gray or red dots on each side of the targeted mob's bar. Gray indicates you are outside of physical attack range and red means you are close enough to engage in a physical attack.
- The color of either of the bars is also an indicator. This notes the difficulty level of the mob, player, or NPC you have targeted. The colors go from: Easy - Difficult in varying levels. Each level of difficulty is represented by colors. Gray > Green > Yellow > Dark Orange > Red
You're now ready to attack! Hit the Q (default) or you can hit your Start Attack button.
You'll get bars at the top right of your UI (you can't seem to move these) that show the speed of your attacks and nano (if used). Continue to fight the Malfunctioning Cleaning Bot until it is defeated. After defeating a mob, you will be able to loot it. Hover your mouse over the dead mob and when a gear appears, Right Click on it. This will open a new window where loot might be found. If there is anything, Left Click on the items to put it in your inventory. The Loot window will close when it is empty.
Congratulations, you've killed your first mob! Now, defeat four more Malfunctioning Cleaning Bots. The game will play a sound when the current mission is done, and a new mission will appear in your Mission window asking you to return to Rex Larsson.
- NOTE: If you plan to do the Shoulderpads Quests once you reach Rubi-Ka, you can get a jump on Acquiring the Robot Parts as the Malfunctioning Cleaning Robots drop all of the required parts to get you started! (AOU Verified). It's easier to farm there here than on the mainland.
Rex isn't done with us yet! He gives us another mission! This time, we need to Open a Cargo Box. If you look at your Compass, you will see an orange dot, pointing to where the Cargo Box is.
Once you reach the Cargo Box, target it (Left Click on it) to select it, then Right Click on it to open it, finishing that part of the mission. With that done, return to Rex and have another chat with him. He will send us to the next NPC we need to talk to to get our ID card to help get us off Arete!
- NOTE: When you have completed a mission in your Questline, you should almost always have an orange dot on your Compass to point you to your next mission. There are rare instances where that might not happen, but that should not apply often, if at all in Arete.
⇑
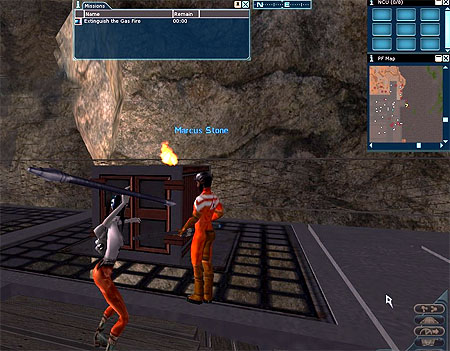
2. Marcus Stone - 3626.6x828.1
Overview
Step 1: Talk to Marcus Stone.
Step 2: Extinguish the Gas Fire.
Step 3: Return to Marcus. Reward: 1080 credits; (up to) 1281 xp; Generic Nano Transmitter.
[Reveal] Walkthrough
Well, wasn't Rex a charming batch of sunshine. Meh. Well, time to move on. We need to find our next NPC, Marcus Stone. Head east then north down the ramp, where you will come across another tutorial. This one is about First Aid.
⇑
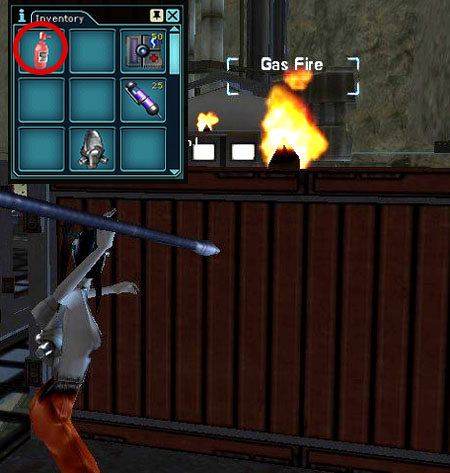
Gas FiresMarcus Stone will refuse to talk to you when you first approach him if he is fighting a Burning Cleaning Robots. He will tell you:
What're you looking at? Help me out here!
Once he has killed the burning robot, he will be ready to chat!
He wasn't kidding when he said he needed help. He's going to ask you to help him extinguish one of the gas fires burning on containers around you both.
Time to fulfill your dreams of being a firefighter! Find one of the fires on the boxes nearby and target it Left Click on it. Then, go to your Inventory, Left Click the Compact Fire Suppressant Container Marcus gave you during your chat with him, and pick it up. Next, drag it over the Gas Fire to put it out (it might take a few tries to get it right in the Gas Fire). Once that's done, return to Marcus.
NOTE: If you accidentally delete the Compact Fire Suppressant Container delete the mission for extinguishing the Gas Fires, return to
Rex Larsson Waypoint
and he will give you a chance to ask what you're supposed to do again. He will then send you back to - 3624.5x787.8
Marcus Stone Waypoint
and you and get the mission again with a new Compact Fire Suppressant Container. - 3626.6x828.1
Once the Gas fire is out, return and chat with him again. He will compliment you on your work and ask for the Compact Fire Suppressant Container back. When he does, you'll notice a small window will pop up to the side of the NPC chat window. This is where you will open your Inventory, pick up the Compact Fire Suppressant Container by Left Clicking on it, then drop it into the Give Item box. After that, press the check mark.
Once that is done, he will make good on his word and give you a thin, flat, metallic disc, barely larger than a fingernail. Marcus will give you a Generic Nano Transmitter, needed to make your ID card.
Finish up your chat with him, but before you run off, you might want to ask him about the wounded workers you see laying around.
⇑
Wounded WorkersOverview
Step 1: Ask Marcus about “Are those wounded workers your guys?”
Step 2: Use the Stim on a Wounded Dockworker. Time: 8 hours.
Step 3: Return to Marcus Stone. Reward: 1040 credits; (up to) 1281 xp; Health and Nano Recharger x50; Health and Nano Stim x25.
He will tell you those are his guys. He wonders if you wouldn't mind helping him at least one of them. This time you want to head to the west, where you'll find the Wounded Workers laying on the ground.

Target one of them by Left-Clicking the worker. Then in your Inventory and Right Click on the Health Regeneration Stim that Marcus gave you. If successful the Wounded Worker will get up and run off.
Return to Marcus for a reward.
Marcus will give you 50 Health and Nano Recharger and 25 Health and Nano Stim. Also, you should have enough Experience (XP) Points to reach the next level!
⇑
3.Flink Novak - 3598.1x862.5
Overview
Step 1: Talk to Flint Novak.
Step 2: Find a Bio Analyzing Computer (kill 7 robots). Reward: Bio Analyzing Computer.
Step 3: Deliver the Bio Analyzing Computer to Alex Gibbs. Reward:Blank Info Chip.
[Reveal] Walkthrough
We have our first item needed to leave Arete Landing. Now it's time to find Flint Novak. He's a little west, down ramp. You'll find Flint by the building up ahead.
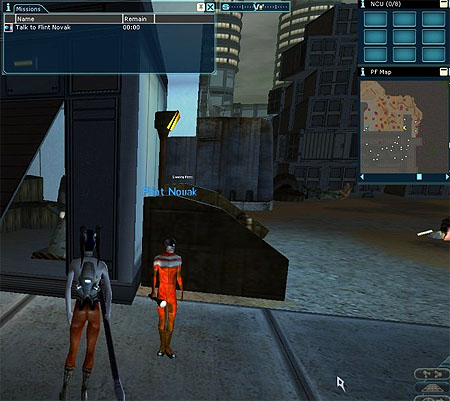
Have a chat with him and he will tell you about the junkyard and ofc, ask for some help before you can get any more parts for your ID Card!
He wants you to go into the Junkyard through the entrance right next to him and find him a part for his friend Alex. Of course, this part is not one you'll just find laying around. Luckily, you won't have to loot these mobs to get your part! However, it looks like it's time to kill more robots to get them to give up the part. In this area, there are many types of monsters, and once you enter the junkyard you can start killing.
The below three Junkyard Robots will count towards Flint's quest.
- Cleaning Robot
- Waste Collector
- 32-V Docker
You can kill a combination of the above mobs or just one of the listed mobs. As the cleaning robots are the closest to the entrance they are quick and easy and will earn you all the credit you need to get the part. Regardless, after you kill a number of the robots listed, check your inventory.
When you've killed enough mobs you will automatically have in your Inventory a Bio Analyzing Computer. We need to take this right to Alex Gibbs (no need to go back to Flint).
- Note: Check your Default chat window for a system message regarding your kills. If you lose count of your kills, the game happily reminds you how many more you need!
You have to kill 6 more Junkyard Robots to fulfill one of your missions!
⇑
4. Alex Gibbs - 3520.9x856.8
Overview
Step 1: Target the Surveillance Droid and use the SecTec Monitor.
Step 2: Find a suitable place in Desmond Calitri's office to plant a bug.
Step 3: Deliver the SecTec Monitor to ICC Immigration Officer Bill.
Step 4: Defeat "The Kneebreaker".
Step 5: Report to Alex. Reward: 2560-Bit Encryption Complier; Nano Crystal (Composite Tradeskill Expertise).
[Reveal] Walkthrough
I hope you didn't get too much robot oil and grease on you. It's time to find Alex Gibbs.
From where Flint is standing you can find Gibbs a bit West. To reach her you can either make your way through the junkyard and jump over the wall behind her, or you can travel the road.
To take the roadway, go back to Flink Novak and go South around the front of his building. Turn West and go through the gap in the storage containers. Follow the road until the compass indicator turns East. Alex Gibbs should be right in front of you.
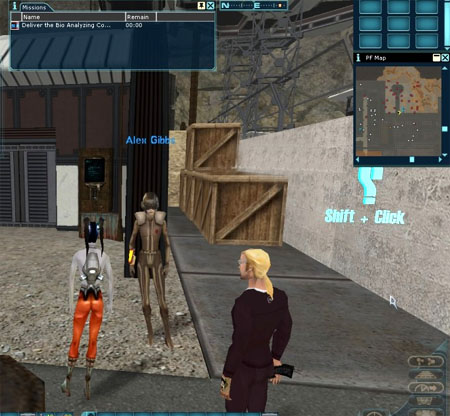
This mission isn't as easy as just killing a few robots this time. It has a few different steps to it. Let's start by talking to Alex and tell her that you need her help. After she tells you she can you help with your ID, she examines the part from Flink Novak. Turns out she already had that part but provides you with a Blank Info Chip anyway. However, to continue, she needs a favor. Of course she does!
Alex wants to know why Desmond Calitri, the administrator of the industrial area of Arete Landing has been cutting important budgets for her engineering projects. She wants you to find out why, but quietly, without confronting him if possible. To do so she wants you to hack into one of his patrolling security droids, as well as plant a bug in his office!
Oh, is that all? No! No, it's not. After all the sneaky business, she wants you to speak with her ICC contact, Bill.
So, off we go on the first part of the mission!
Finding the Surveillance Droid.
Go South West on the road and around the corner, past the NPC ICC Immigration Officer Bill, and head East. Continue straight down the road a little following the orange dot on your compass until you see the
Surveillance Droid
- 3563.1x822.7
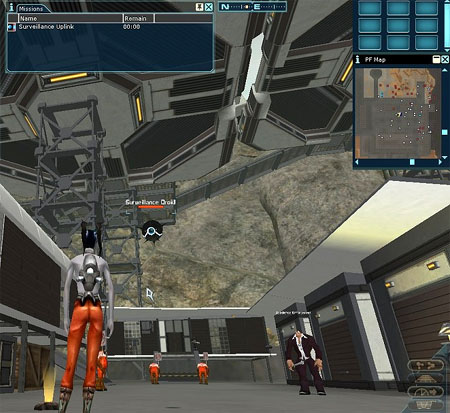
Surveillance Droid
Target (Left Click) the Surveillance Droid and activate (Right Click) on the Rebuilt HC-12 SecTec Monitor in your Inventory to complete the hack.
Once done, your mission will update and our next step awaits.
Plant a Bug.
Continue down the road past the Surveillance Droid to the house at the end, where Bodyguard Logan Fixx is. Enter the house, and find the Prized House Plant next to the next. Pick up the RC-P Audio Recording Device from your Inventory, and Drop it (L-click) on the Prized House Plant until the bug disappears from your inventory. It might take a few tries to get it in the right spot).
With the first two parts of this mission done, it's time to Give the Rebuilt HC-12 SecTec Monitor to
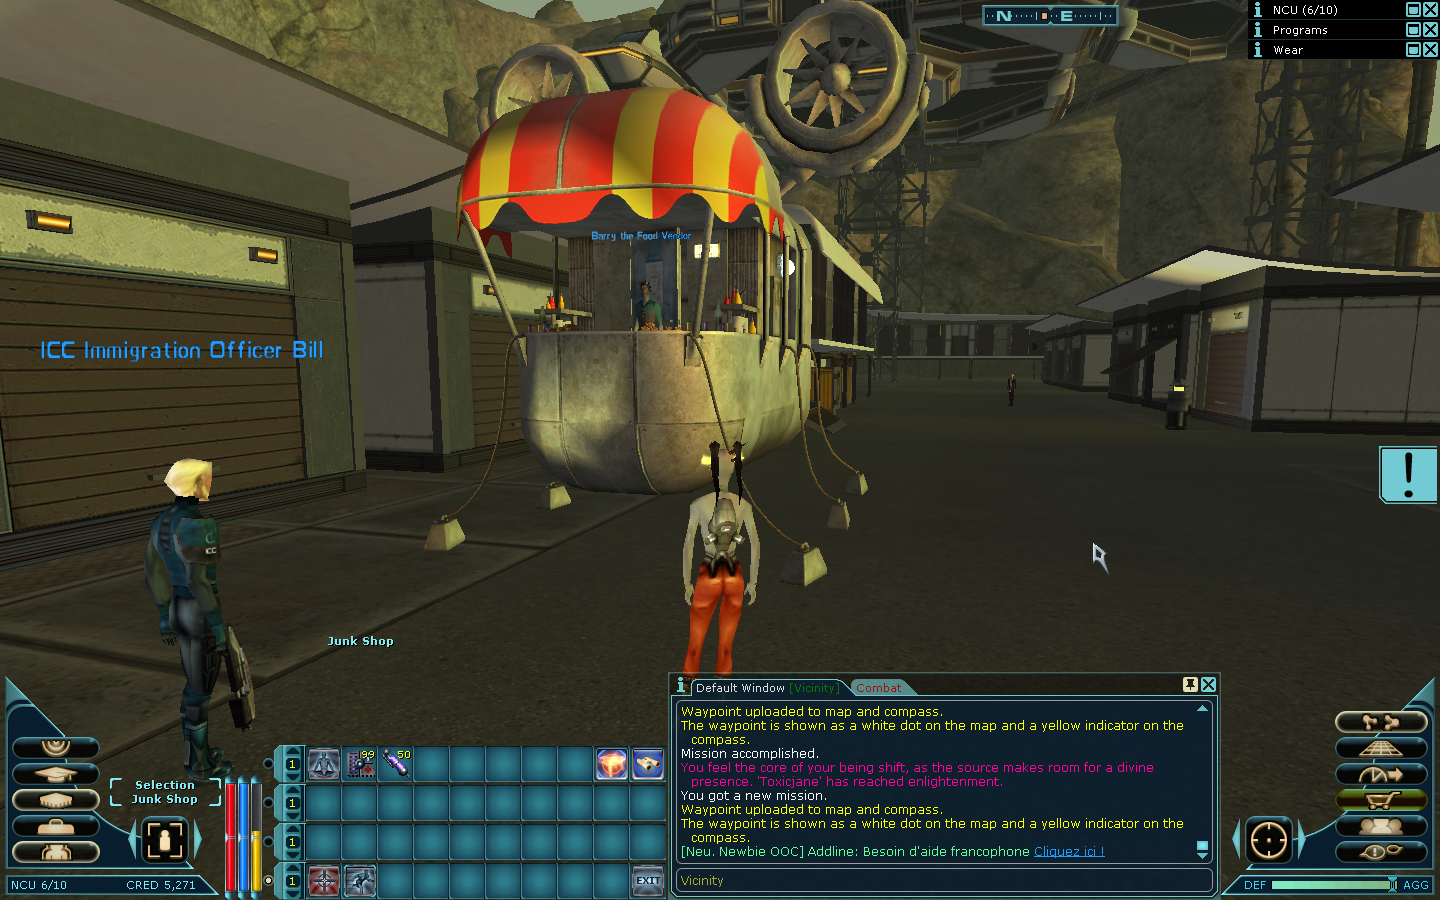
ICC Immigration Officer Bill
- 3510.5x826.5
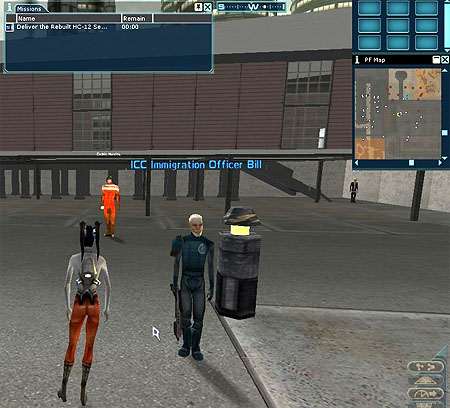
Before you can even ask Bill for help he informs you that he's concerned about a number of so-called "accidents" here in Arete. Once he is s done talking about terrorists and potentially undocumented citizens, you need to make a conscious choice.
NOTE: ONCE BILL GIVES YOU HIS MISSON, HE WILL NO LONGER TALK TO YOU ABOUT LIFE ON ARETE. Hes solely focused on teh mission at hand. Because of this, if you wish to hear Bill's knowledge on Arete, be sure you either speak to him BEFORE start, or AFTER you finish his missions before trying to talk to him about Arete.
Whether you opted to listen to his Arete information first or decided to jump right into his mission, we need to tell him Alex Gibb sent us to show him the Rebuilt HC-12 SecTec Monitor.
Alex Gibbs thought you may be interested in seeing this?
Once we trade it to him in the window provided by our chat, his excitement is interrupted by something he hears through the bug monitor we just gave him.
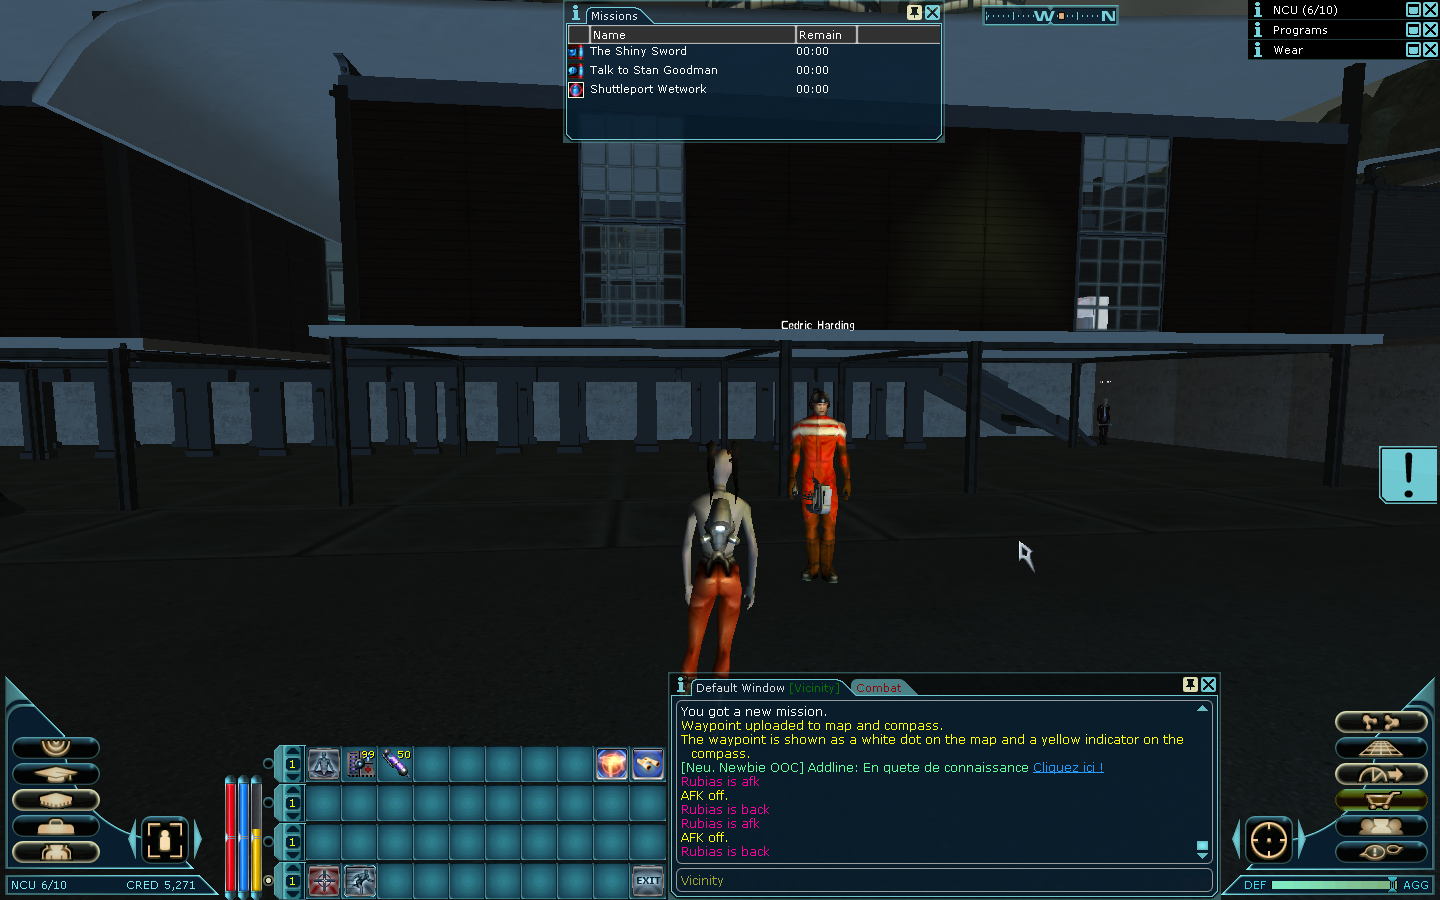
It seems the bug lets him hear Desmond Calitri planning something nefarious. Calitri wants the known hitman type guy named "Alfonzo Rizzolo" to arrange an "accident" for a head worker, Cedric Harding. Bill is worried that he can't report this to ICC forces fast enough and by then it might be all over.
Well, You've come this far in Alex's mission, you might as well help Bill, so you tell him that you will take care of it.
Bill seems a little unsure you can handle this dangerous mission by yourself, but he sends you to take out Rizzolo. After he does so, he realizes that he doesn't know you at all, and he could get in trouble for sending you in. So, he decides to pretend he doesn't know about any plan and warns you Not to talk to him again! (Remember once he gives you the Knebreaker mission, he will respond to you further).
Once done, your mission will update and our next step awaits. Time to save a life!
Kneecapping a Kneebreaker.
To find Alfonzo Rizzolo, From Bill, start out East. Take the first
North Ramp
. Go east around the back of the building, then into the second doorway on your right. Inside you'll find the - 3533.5x825.3
Kneebreaker
. - 3580.0x832.7
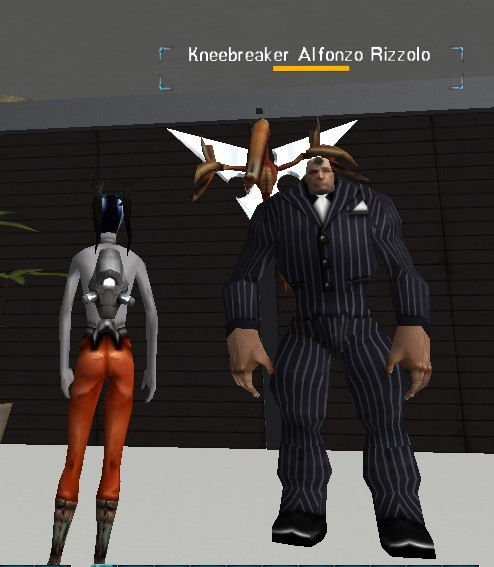
You'll need to open a chat with him and tell him you are there to end his plans. He doesn't like this and after calling you a name, attacks you. Go ahead and kill him and the Bruiser if it appears, (Kill Kneebreaker fast enough, no Bruiser spawns).
- NOTE: Interestingly enough, if you tell him you are there for a job before you tell him his evil plans are over, tries to send you to his boss Desmond Calitri for an assignment.
Once he is dispatched, it's finally time to return to
Alex Gibbs
. - 3520.9x856.8
Report to Alex
When you report back to Alex and tell her that you don't think she will need to worry about Calitri any longer, she excitedly tells you that is FANTASTIC! She then gives you an 2560-Bit Encryption Compiler and tells you that will help you once you locate a proper ID chip and some authentic ICC security codes. She sends us to Stan Goodman, a local merchant. Hopefully, he can help us with the next step in this process!
As a thank you Alex will give you a Nano Crystal (Composite Tradeskill Expertise). You'll need Psychological Modifications at 20 to use this.
⇑
4a. Alex Gibbs and Personalized Basic Robot Brain - 3598.1x862.5
Overview
Step 1: Buy a Screwdriver. Find Robot Junk (higher QL the better). Modify the Robot Junk with the Screwdriver.
Step 2: Buy a Bio Analyzing Computer. Apply the Bio Analyzing Computer to the Basic Robot Brain.
Step 3: Buy a MasterComm - Personalization Device. Apply the MasterComm - Personalization Device to the Basic Robot Brain.
Step 4: Show the Personalized Basic Robot Brain to Alex Gibbs. Reward: Personalized Basic Robot Brain.
NOTE: This is a side quest and offers no benefit toward getting your ID Card finished. However, if you are new to game, or returning to the game, it's a good first look into something you will spend considerable time doing or having done: Tradeskilling. The only way to obtain certain items or devices is to assemble them.
[Reveal] Walkthrough
It's hard to say no to Alex's useful lesson and a Personalized Basic Robot Brain seems to make ...Sense Also, this will show how to start tradeskilling items as you'll need to know for a few of the future quests on Arete Landing.
Tradeskilling
Now that you've decided you want that brain, let's start by asking her if she will tell you how to make a Personalized Robot Brain. She happily tells you the simple steps, (in her mind at least), and what items you and where to find them.
NOTE: This mission will help you learn the basics. However, in general, only Engineers and Traders are equipped with a profession Skill set, and select Tools to help them master the art of complex tradeskilling. If you are interested in learning more about tradeskilling, visit our guide: Introduction to Tradeskilling.
We are going to make a Personalized Basic Robot Brain. There are a few steps to this, so let's start! First, we need to get a Screwdriver and some Robot Junk. If you look behind Alex, you will see two machines/terminals. There are many like this which are used as shops. The left one is for Ammunition for weapons, while the one on the right is the Junk Shop.
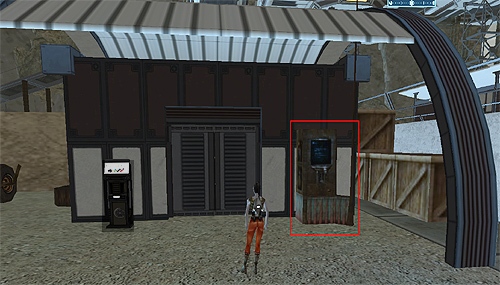
Junk Shop
Right-Click on the Junk Shop, which will open up the Shop menu on the right side of your UI. For now, we want to buy (right-click) on the Screwdriver.
NOTE: You can also sell some of the items from your Inventory that you have picked up to make some extra credits. Just, pick the items and drag them over to the hop, and into the Sold Items boxes at the bottom of the Shp window. (you can keep clicking items on top of each other there as it will keep adding the credits up).
Now, for the Robot Junk, we'll need to kill robots in the area. The Junk comes in different Quality Levels, which will affect the Quality Level (QL) of the item you make. So try to find a high level one.
Now that we have both items, you will want to hit Shift+T to bring up your Tradeskill Kit window. Here, you need to add an item for a Source and one for the Target. So, for this combine, we want to put the Screwdriver (Source) and Robot Junk (Target). When you have it correct, you will see the icon of a Nano Sensor in Result. Click Build to make the Nano Sensor which will go in your Inventory.
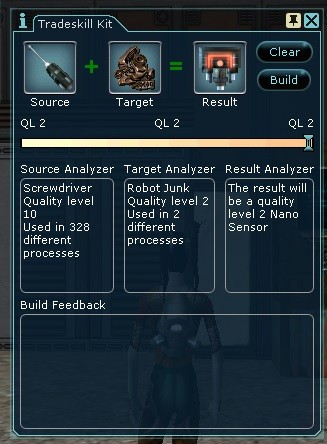
Next, we need to buy a Bio Analyzing Computer from the Junk Shop. We need to combine the Bio Analyzing Computer (Source) and Nano Sensor (Target) to make a Basic Robot Brain.
After that, we need a MasterComm - Personalization Device from the Junk Shop. We need to combine the MasterComm - Personalization Device (Source) with the Basic Robot Brain (Target) to make a Personalized Basic Robot Brain.
Whew! All done. Now let's show this to Alex. After she brags about her own accomplishments for a second, she asks you to show her your brain. Once you trade her the Personalized Robot Brain via the chat window, she backhandedly compliments you on your creation and advises you may want to find tradeskill professionals in future. She then tells you to keep your "trinket" and wishes you luck as she dismisses you.
Looking at your new Personalized Basic Robot Brain you should notice it offers some extra Sense skill and it can be worn, so long as you have the skill to do so (you'll need Computer Literacy of 30 to do so).
⇑
Patrick Sun and Insurance Terminals - 3462.5x812.5
NOTE: You should see this guy just before you enter the market.
This is a side quest and offers no benefit toward getting your ID Card finished. However, it will be a great time saver should you find yourself sent to Reclaim (dead..if you're dead).
Overview
Step 1: Talk to Patrick.
Step 2: Touch the Insurance Terminal.
Step 3: Talk to Patrick again. Reward: Belt Component Platform 300X
[Reveal] Walkthrough
On your way to talk to Stan Goodman you come across a guy with a Box on his head...no, really. It's a box! You just have to talk to him to see what his deal is. His name is Patrick Sun, and he's a real jokester, if not a little offensive! Try asking him about the Insurance Terminals next to him. After cracking himself up, and frustrating you he finally relents and asks you to ...touch his terminal (yeah, I know), what a weirdo. But a mission is a mission! So go ahead and Right Click on the terminal. It will take some credits and save some XP.
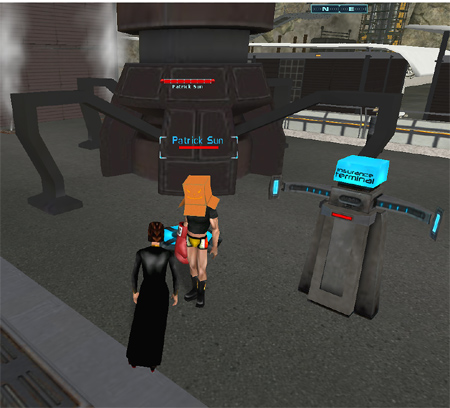
After you do that, talk to Patrick again, and find out how much of a nasty right hook he has. So bad, he kills you. EVIL WEIRDO!!
When you wake up, you'll be at the Insurance Terminal. You're none too happy and have another chat with Patrick about that. When he's done laughing at his joke on you, he tells you he told you not to ask stupid questions. Once he realizes how mad you are he tells you to relax and tells you how much better you look in your new body. He then promises to make it up to you. He hands you a new QL 30 shiny belt!
You'll need Computer Literacy of 76 to wear.
It's a quick and dirty mission that will prevent you from having to run all the way from the start of Arete. (Of course, if you're out in the wilds of Arete dealing with aliens, you're still screwed). But, you got a decent belt out of it!
⇑
5. Stanley Goodman - 3463.0x880.2
Overview
Step 1: Talk to Stan Goodman.
Step 2: Buy a Lockpick.
Step 3: Take the Contents of the Strongbox.
Step 4: Deliver Adaptation Factory to Stan Goodman. Reward: 1240 credits; (up to) 2229 xp; Unprogrammed Identification Chip.
[Reveal] Walkthrough
Now that you finally have a brain...it's time to head to our next NPC, Stan Goodman. You can find him in the northern part of the Market Place, standing in his vendor stall. (Just follow your compass dot).
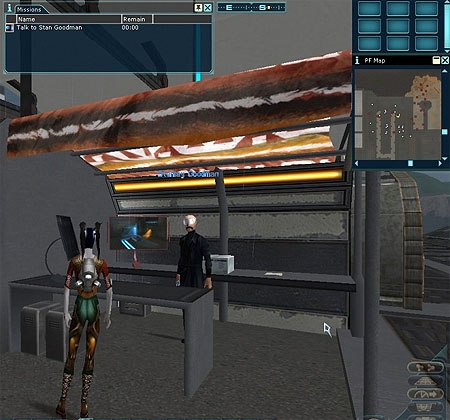
Once you tell Stan you heard he can help you, he realizes you have a problem. Of course, he is willing to help...once you help him. And of course, it can't just be straightforward. He wants an item out of a locked strong box.
The work itself is relatively simple:
1. Buy a lockpick.
2. Sneak into the small building undetected.
3. Locate and open the strongbox.
4. Procured item and return to Stan
I hope you don't mind being a little bit sneaky and doing some breaking and entering, cause we're going to be doing just that. But first, we need to go get ourselves a Lock Pick. You can buy one from the
ICC Tech Supplies vendor machine
. It's in the same building as Vernon Godfray. - 3442.3x823.0
You will want to buy a Vacuum Packed Lock Pick. Right-Click the item in your Inventory to get your Lock Pick.
Now head to the container. You can find it in the far NW corner of the market, in the back of a room.
Strongbox Room
- 3407.9x877.6
Here things can get a little tricky as you have an NPC and a Security Dog in the area. You're going to have to rely on your Concealment skill!
Wait, what is concealment? Okay, before we go ahead and attempt this deadly mission, let's answer that.
Concealment
Description: For those skilled in stealth and subterfuge, it is possible to move past hostile targets. To enter Concealment, press [H] (by default).
* The Concealment skill of the user versus the Perception of the target determines if it is possible to successfully hide.
* Movement in Concealment is slowed.
* Using many types of actions, or receiving a hostile action, will cause Concealment to end.
Okay, so now you see what concealment is. Why is it important now?
Because, unless you wait until your a higher level, the chances are that guard dog is twice your level and has a bright red bar! So, to get by the guard dog, we need to sneak. What you want to do is press H to sneak before moving into the building. If done right, it will say you start Sneaking.
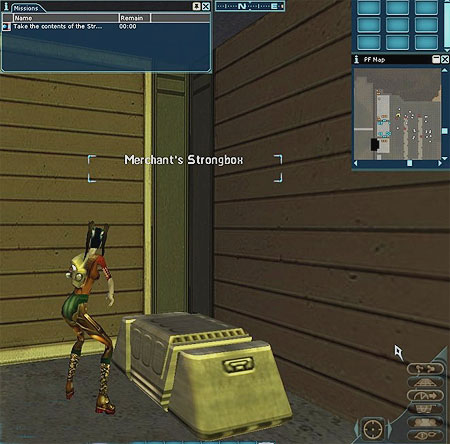
You then want to proceed to sneak into the back room and target the container you see there, (by Left Clicking on it). Once done, you need to go to your Inventory and pick up the Lock Pick, and Right-Click it on the Merchant's Strongbox. The box will open and in your Default window you will get the message:
You successfully picked this lock and obtained the Antonio's Adaption Factory.
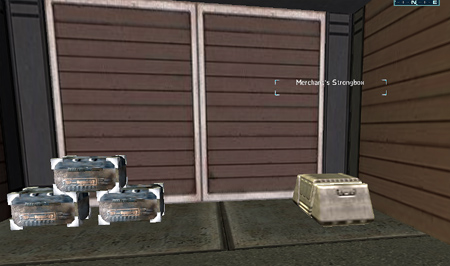
Merchant's Strongbox
NOTE: The instant you pick the lock and open the Merchant's Box you will stop sneaking. This can be a pain if the Security Dog detects you and walks in to get you. But when done correctly, you'll get Antonio's Adaptation Factory into your Inventory.
Once you have the Antonio's Adaptation Factory, it's time to go back to Stan.
When you reach him he's going to ask you to give him the Generic Nano Transmitter, the Blank Info Chip, the 2560-Bit Encryption Compiler, and of course, Antonio's Adaptation Factory.
Once Stan pockets the Adaptation Factory, he starts talking while fiddling with the parts you gave him. He tells you that you should go see some of his "associates" if you haven't already. He recommends talking to Sarah Greene, but leave his name out of any dealing with her. He then says we should hit up Marco Spisa and buy one of his ...Nano Containers. Before he sends you off, he hands you back the parts you gave him, newly made into a:
As you leave he tells you if should you ever decide you want slightly more... stable, if not entirely *legal* employment, you know where to find him. Don't believe him! After you get your chip, he's done with you. So, off to the next NPC to see if they can, and will help us!
⇑
6. Marco Spida - 3407.7x831.0
Looking in our Mission Window you should have two new missions, first! Let's go get some nanos for your specific profession. Just follow your compass dot southwest from Stan and you will see The NANO room, (opposite the room with the Merchant's Strongbox in it). You can't miss it with its big
NANO Sign
. - 3407.7x846.7
Overview
Step 1: Buy some Nano Programs from Marco Spida (of your profession).
Step 2: Open the Nanoprogram Container. Reward: 1120 credits; (up to) 2229 xp; Nano Crystal (Composite Attribute Boost).
[Reveal] Walkthrough
When you enter, you'll find Marco Spida ready to give you a tutorial on nanos. If you are unfamiliar with what Nanos are or how they work, have a chat with him, and he will fill you in.
Marco is on the other side of the desk.
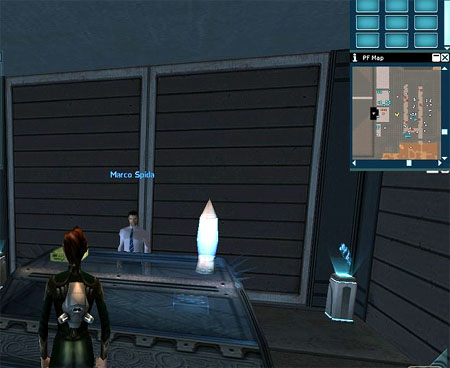
Marco Spida
Whn he's done telling you all he knows about nanos, he invites you to look at his inventory and purchase for the right package of nano programs to suit your needs.
What you now want to do is look at the far bottom of the NPC chat window and click on the icon that is a shopping cart (far right one). That will bring up the NPC's shop window. Look for the one of your profession and make sure you have enough credits, before you attempt to buy it. Then left-click it, effectively adding it to the "Brought Items" section of the Shop Window. Once you have made your profession-specific Nanoprogram Container selection, purchase it by clicking "Accept" at the bottom of the Shop Window.
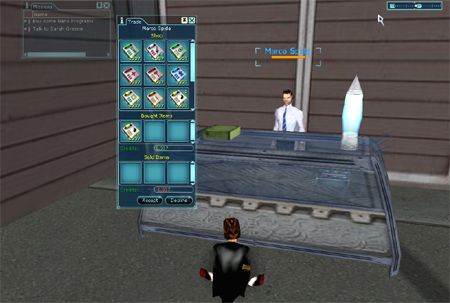
Nano Program Shop
Once you have made your purchases, right-click on the Nanoprogram Container in your Inventory to open it and release any nanos inside. Make sure you have enough of each Nano Skill required (Check your IP window), and Right-click the nanos to learn them.
Opening the Nanoprogram Container will complete the mission as well as give you a Nano Crystal (Composite Attribute Boost) which needs Psychological Modification and Sensory Improvement and Modification both at 30 to learn.
NOTE: If you do not have enough credits it will not drop down to this of the Shop Window and it will tell you: You can not afford this item.
It will also indicate how many more credits you need.
Some nanos might not be able to be used right away, but you should be able to use them all soon enough and have enough IP put in the right skills (make sure you Shift+Left Click on the nano so you can see what requirements you need).
⇑
7.Sarah Greene - 3471.1x840.8
Overview
Step 1: Talk to Sarah Greene.
Step 2: Find the Thief in the Underground.
Step 3: Deliver DNA-Locked Armor to Sarah Greene. Reward: Biological Survey Nanobots.
[Reveal] Walkthrough
Once you find Sarah Greene in her ARMOUR stall, open up a chat and tell her you've heard that she might be able to help you out. Maybe you can even help each other!
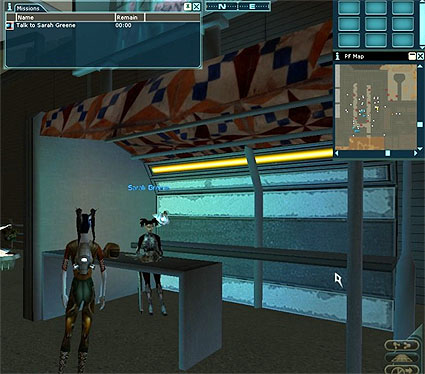
She's ready to help you...as soon as you help her, first! (Are you surprised at this point?).
It seems someone stole her DNA-Locked Prototype Raven Combat Armor suit she was workin' on. She tells you there "ain't" much they can do with it, bein' DNA-locked to her, but it's still a pretty significant amount of her effort and time so she wants it back. If you get this returned for her, she will see what she can do about helping with your own issues.
She would like to find and return her:
So, let's go Find a Thief!
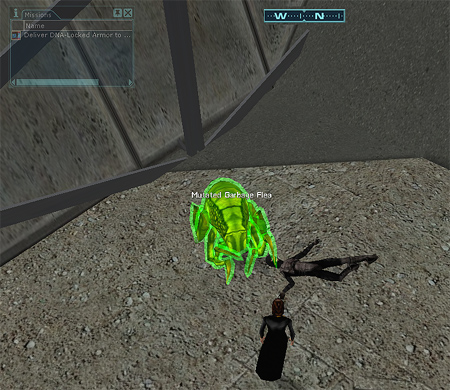
The thief is said to have headed somewhere underground, under the market. Make your way down there by first heading south, past Patrick Sun, and you'll drop down to find the Underground entrance. As you enter the Underground, be careful as some Garbage Fleas can be ready to attack, and they are all along the way to the end of the path.
Follow the Compass dot, and you'll find your thief. Doesn't look like the thief got too far. Looks like he tangled with a Mutated Garbage Flea boss down there. The same Dynamic (Dyna) Boss that is now sitting on the dead body of our thief! Don't feel bad about looting his rotting corpse to get the armor back, the suit will be slimy, but fine.
Be advised though that the Garbage Flea boss may very well attack you and another regular Garbage Flea will spawn, and attack you as well. So, you might want to make haste and ...RUN!!
Dead Theif
Phew! You made it out of there. You were smart to run up to the guard at the Underground entrance if you couldn't send those fleas and their boss back to reclaim... (Dead...I said it earlier. DEAD!). Okay, let's head back to Sarah.
Tell her that you found her stolen armor and she will ask you to trade it back to her. At the same time she will give you for your card:
She then cheerfully sends you off to see Vernon Godfray!
⇑
8.Vernon Godfray - 3433.9x825.8
Overview
Step 1: Speak to Vernon Godfray.
Step 2: Hack the Omni-Tek Technical Library.
Step 3: Give the Hacked Technical Library to Vernon Godfray. Reward: Hacked Technical Library.
[Reveal] Walkthrough
Onward to the next NPC, Vernon Godfray. You can find him in the building just South West of Sarah, (the same building you bought the Lock pick in). Vernon is behind the desk.
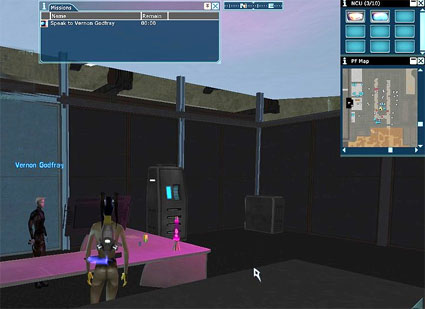
Once you reach him, open a chat. He seems very focused on something other than you and is a man of few words as he hands you two objects and seems to expect you to do...something for him.
Ah, another ray of sunshine. Apparently, Vernon wants us to do a bit of hacking for him. First, open the Tradeskill Kit (Shift+T) and put the Hacker Tool (Source) and Omni-Tek Technical Library (Target) to make the Hacked Technical Library. Now talk to Vernon again.
Once you get the hack done, chat with Vernon again, and let him know you hacked the device. If you thought he'd be excited about your accomplishment, you'd be wrong. The man's head barely even tilts upward, keeping his focus on the odd objects in his hands. Once he acknowledges you he will want the device back. Hand it to him, and he will return it to you, call you a dog and at the same time remind you that you need help with your ID. Which, for a price...he will help you...Right!
(need Computer Literacy at 50)
He leaves you the Hacking Device, also. He wants you to hack a Shipping Manifest Terminal and alter it to reroute info to...him! He explains how to get it done and sends you on your way!
Now to find that Terminal and do some Cargo Liffting from it. Just follow the Compass Dot and you will find the Shipping Manifest Terminal in one of the rooms in the same building as The Kneebreaker you took out for ICC Immigration Officer Bill.
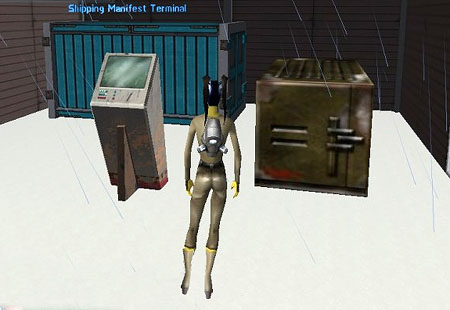
Here you will find the Shipping Manifest Terminal. Right-Click on the terminal, and follow through the chat. It will deny you access but use your Hacker Tool, and all with be fine...hopefully!
With that done, it's time to return to Vernon. Telling him you hacked the terminal will prompt him to ask you for your ID chip. He programs your chip with official ICC clearance codes and hands it back.
His eyes glass over and just before he turns back to the parts on his desk, he tells you that you should go visit Doctor Mason.
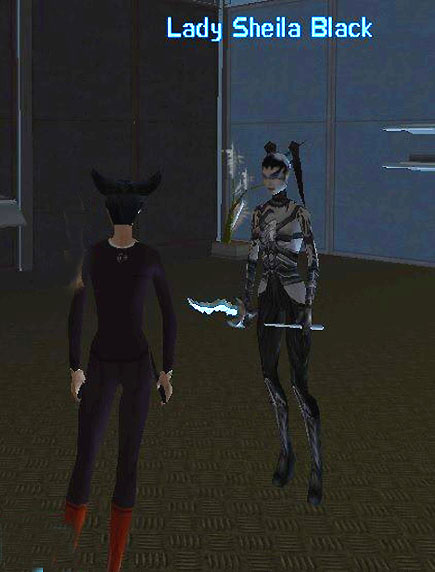
NOTE: There are two different people you see depending on your profession.
- *If you are a Shade, you speak to Lady Sheila Black.
*All other classes continue on to Doctor Mason.
⇑
9. Sheila Black or Doctor MasonOnce you're done with Vernon he sends you on your way. Depending on what breed you are he will have directed you to one of two new NPCs.
⇑
9a. Lady Sheila Black ([b]SHADES ONLY)[/b] - 3411.6x903.7
Overview
Step 1: Upload Nano Crystal (Spirit Siphon).
Step 2: Use Spirit Siphon on a monster with < 21% health.
Step 3: Loot the Soul Capsule and return to Lady Sheila. Reward: Comfortless Spirit of Defense.
Step 4: Equip the Comfortless Spirit of Defense.
Step 5: Talk to Lady Sheila. Reward: Personalized ICC ID Chip.
[Reveal] Walkthrough
NOTE: If you're not a SHADE, skip to the Doctor Mason portion of this quest.
Since Shades do not use Implants, we need to speak to a specific person to learn about Spirits. That person is Lady Sheila.
Start a chat with her and tell her you were told she could help you out! Shelia is glad to see another possible shade. She will be glad to help you once you prove you truly are a shade.
She hands you a Nano Crystal (Spirit Siphon), something you may have gotten beforehand if you bought your nano pack. You are to head out and fight a mob, any mob, and then when their health is under 20%, use the Spirit Siphon. This will net you a:
Let's go back to Lady Sheila with the Soul Capsule, and hand it over to her when asked. She will praise you and hand back the Soul Capsule and also give you a Comfortless Spirit of Defense, telling you that you can open them, and whether more Spirits to wear. Since you don't need the Surgical Clinic to put on Spirits, just right-click it to 'wear' it in your Legs slot in Implants. Talk to Lady Sheila again, when you have done that.
She agrees to help you and asks you to hand over the Blank ICC ID Chip, and Biological Survey Nanobots. Then she touches you. It's not a pleasant feeling but somehow while you were dealing with the discomfort, she made you another piece of your ID:
After you thank her she tells you that you should talk to Lorelei to see what she's involved in.
⇑
9b. Doctor Mason - 3430.6x795.6
Overview
Step 1: Talk to Doctor Mason.
Follow these steps below exactly.
Step 2: Buy a Basic Leg Implant. Buy an Agility Cluster - Shiny (Leg). Insert the Agility Cluster - Shiny (Leg) into the Leg Implant.
Step 3: Buy a Stamina Cluster - Bright (Leg). Insert the Stamina Cluster - Bright (Leg) into the Leg Implant: Agility, Shiny.
Step 4: Buy a Max Health Cluster - Faded (Leg). Insert the Max Health Cluster - Faded (Leg) into the Leg Implant: Agility, Shiny.
Step 5: Show Doctor Mason the Leg Implant: Agility, Shiny. Reward: Leg Implant: Agility, Shiny.
Step 6: Install the Leg Implant: Agility, Shiny.
Step 7: Talk to Doctor Mason. Reward: Personalized ICC ID Chip.
[Reveal] Walkthrough
NOTE: Everyone other than SHADES will talk to Doctor Mason.
WARNING: Doc Mason will refuse to talk to you if you dare to make an implant with clusters other than what's specified & try to give it to him. You can't get the final missionthen. At that point you can either petition, do the 15k bribe, or reroll (start a new character).
Time to see the Doctor! Well ... not that doctor, but Doctor Mason. He is found just Southwest, across from the building where Vernon is, in the Implants/Pharmacy building.
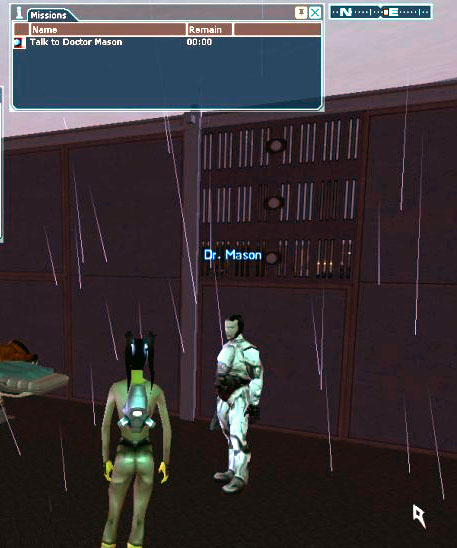
Talk to Doctor Mason and tell him what a bind you're in. However, he doesn't want to give something for nothing. He wants to test out his Implant assembly process! He will instruct you on how to make an implant, as well as how to wear them. Follow his directions carefully!
Time to do a bit more crafting!
If you turn to your right, you'll see four terminals, each labeled differently. Three hold Clusters; Shiny, Bright, Faded respectively, and the last holds blank Implants. Doctor Mason gave us a recipe we need to follow in our Mission.
First, we need a Basic Leg Implant. So go to the Implant terminal and scroll down to the 9th row. There are three levels of it (1, 5, or 10) so buy the level 1 implant for 399 credits.
NOTE: You can do a higher level relative to your own, but you need more Nano Programming in order to do the combine; 22 for the level 5. I am unsure about the level 10 implant.
Now we need an Agility Cluster - Shiny (Leg). Go to the Shiny terminal, and scroll to the 4th row. It's the middle one for 1827 credits.
NOTE: Clusters are grouped by part (Leg, Hand, Head, etc.) as well as alphabetically on stat (Agility, 2H Blunt, etc.)
Assemble an Implant
Time to Assemble an Implant 1/1!
Open your Tradeskill Kit window and put the Agility Cluster - Shiny (Leg) into the Source, and the Basic Leg Implant to get a Leg Implant: Agility, Shiny.
Your mission should update and ask you to move on Assemble an Implant2/2.
Now we need a Stamina Cluster - Bright (Leg). Remember, we can't have the same Cluster in all three slots. Go to the Bright terminal, and the cluster is on the 49th row on the right for 761 credits. Combine that as your source and the Leg Implant you already made to add the Stamina cluster.
Your mission should update and ask you to move on Assemble an Implant 3/3.
Lastly, we'll need a Max Health Cluster - Faded (Leg). Skip on over to the Faded terminal, and it's on the 27th row, left one for 368 credits. Combine that as your Source to the Leg Implant you already have to add the Max Health cluster.
Let's return to Doctor Mason to show him what we've made.
He'll hand back your implant and wants you to go install it at the Surgery Clinic. Turn around and you'll see the device in the corner next to a tutorial on Implants.
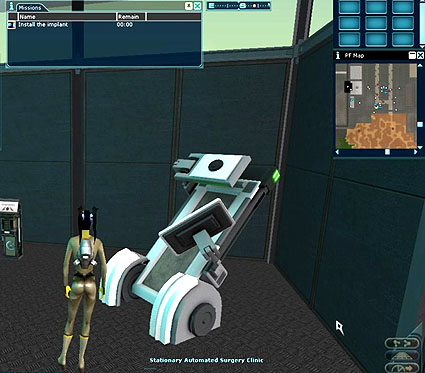
What you want to do is Right-Click on the Surgery Clinic. This will give you a buff for about 5 minutes (or until you leave the building) allowing you to put in and change around your implants. So let's put in the Leg Implant we made. Open up the Wear window (CTRL+1) and click on the Implant tab at the top of it. Pick up your Leg Implant from your Inventory, and drop it into the Leg slot. There you go! You just shoved some weird, mechanical stuff into your body, and you don't even have a medical degree!
Return to the good doctor. He examines you to ensure you installed the implant properly. When he's done he asks you to hand over the Blank ICC ID Chip, and Biological Survey Nanobots. As you do, he pokes you with DNA-Unlocking device, and happily announces his work is done.
Ow ... he could have given us a warning! But anyway, feel free to make more implants for yourself if you'd like!
He hands you a:
After you thank him she tells you that you should talk to Lorelei to see what she's involved in.
Note: Check out Implant Creation if you want to learn more about making Implants, and what clusters go in what Implant.
⇑
10. Lorelei - 3369.2x794.5
Overview
Step 1: Talk to Lorelei.
Step 2: Buy a Tasty Peanut Butter Cookie.
Step 3: Capture Lolly.
Step 4: Deliver Lolly to Lorelei. Reward: Identification Card.
[Reveal] Walkthrough
And now, off to get a drink at the bar and see what Lorelei the Bartender can offer as help! Just go out of the building you're in with the doctor, turn left, then head straight west to the building you see in front of you.
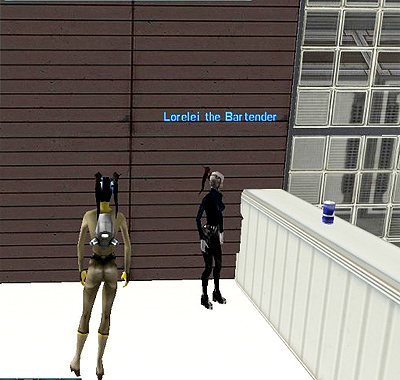
Lorelei is a bit friendlier and seems ready to help you...for a change, and doesn't make you explain everything! But, like everyone before her, she needs a favor!
It seems her pet Reet escaped his cage and is out with a new girlfriend. She's worried about him and hopes you can bring him home. She tells you that he is blue, talks a lot, and he loves peanut butter cookies! Good thing she sells Peanut Butter cookies because she isn't going to give you one with the cage she hands you.
This quest really caught a lot of people in that they didn't pay attention to what Lorelei said.
Okay! First, click on the Shopping Cart for her, and buy the Tasty Peanut Butter Cookie from her shop (11th row, middle, 198 credits).
Let's find Lorelei's Lost Pet
Now we need to do a bit of trekking into the desert and grassy area outside. Head south into the desert, then cross into the grass area. Along the way you'll pass Roller Rats and Desert Reets. The mission will give you a general area of where Lolly is, as the reet flies around. You may need to chase him!
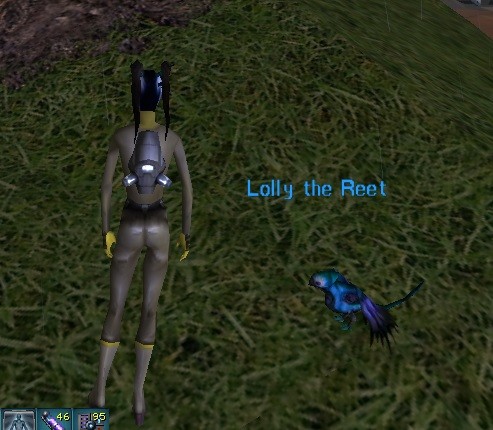
Right-click on Lolly (Flocks, Level 10) when you get close enough to talk to it.
Once you catch up to him and get to chat you ask him to get in his cage. He tells you "U giev cracker! Nao!". Good thing you bought that cookie, huh?
Place the cookie in the open GIVE ITEM window of the NPC chat to give Lolli the Peanut Butter Cookie. Once the bird starts eating the tasty cookie, it is distracted enough that you can: (Quietly pick up the bird). Your chat will tell you that Lolly doesn't notice you tricking him until he's in your hands, and the chat closes, and Lolly will automatically be in your Inventory.
Now you have both Lolly and the cage in your Inventory. Open up your Tradeskill Kit, put Lolly in the Source and the Cage in the Target, (or combine them in your inventory by picking up Lolly, selecting Shift while using the mouse Right-Click on the cage to put him in it), and voila! Lolly is in the cage. Now back to Lorelei.
Once you reach her, tell her you have the bird. She wants her bird and your ID chip too. As she sets the bird cage down she tells you it will just be a second. As she works on your card, you notice Lolly escaping again! Shhh!
She turns and hands you a card:
As you thank her she tells you that you should talk to Vaughn Hammond about entering ICC HQ.
You now have the last item you need to leave Arete Landing!
⇑
⇑
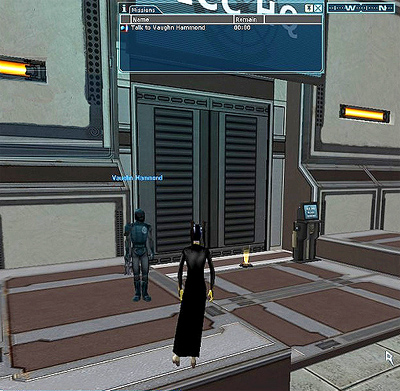
11. Vaughn Hammond (LEAVING ARETE) - 3369.2x827.9
Overview
Step 1: Talk to Vaughn Hammond. Reward: Passage to Rubi-Ka Mainland
This is it folks, the end of our journey on Arete Landing. You'll want to find and speak to Vaughn Hammond by the ICC HQ door.
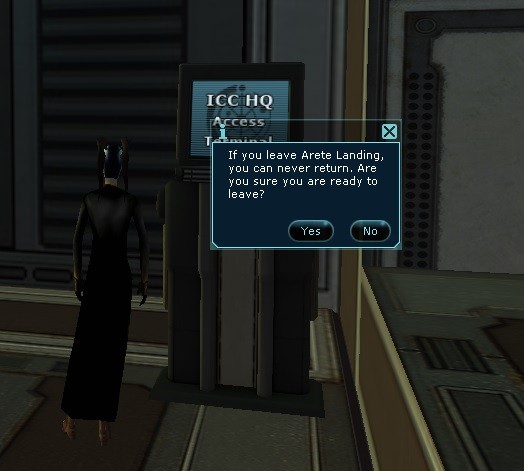
WARNING: You cannot go back to Arete Landing once you leave. So make sure you do all the missions you want to, buy what you need, and are ready to leave.
You have two ways to leave Arete Landing; the quick way or the story way.
⇑
11a. The Quick WaySo, Vaughn Hammond isn't as straight-laced as he seems. He can be ...bribed to get out of Arete before you ever have to even get your ID Card!! If you are here and have no ID Card, you must be in a hurry, so let's not waste time!
[Reveal] Walkthrough
He wants 15k to overlook your lack of an ID and let you through the sealed gate! There are two ways you can do this!
Earn it, which is possible to do but by the time you earn 15K, you might almost as well of earned some levels and items/nanos doing the quest!
Or...you can STEAL IT!
To learn how to steal it (if you haven't already) check out this Credit Card Side Quest to get the Credit Card and steal the money, then head directly to Vaugh Hammond and talk to him.
When he asks for your ID card tell him you're rich until he gives you a price! Pay him using the Give Items/Credits window when it pops up! He's impressed and takes the money, filing a false ID for you and upload it to your NCU!
Once done, go straight to the ICC HQ Access Terminal, right-click on it, and say Yes. You'll then find yourself in ICC HQs, Andromeda. New adventures await!
Welcome to Rubi-Ka Mainland!
⇑
11b. The Story WayIf you've done all the quests, hopefully, you enjoyed your time here..but that time is done! (Unless you want to do the Side Quests at the end of his guide. If so, you can still talk to Vaughn and still back and do them. Once you speak to him you don't have to leave if you want to explore. You're now free to leave when you want).
[Reveal] Walkthrough
Follow all the main quests to get your Identification Card, then go to Vaugh Hammond when you're ready to leave.
Chat with him and he will welcome you to ICC and Rubi-Ka! Hand him your ID Card (you won't get it back), and he will upload your identity details to your NCU.
You may leave Arete Landing whenever you are ready after this point by heading to the ICC HQ Access Terminal to the right of the large door. Right Click on it and you'll be prompted one more time to make sure you want to leave. Hit Yes when you are sure and ready.
You'll now find yourself in ICC HQ, Andromeda. New adventures await you!
Welcome to Rubi-Ka Mainland!
⇑
SIDE QUESTS⇑
12. Desmond Calitri - Kill the ProtestorsMobs you will run into while doing this mission:
- Protester (Level 2)
- Cedric Harding (Level 6) Cedric Harding Waypoint- 3510.3x827.1
- Violent Protester (Level 2)
Overview
Step 1: Find a Bronto Burger food stall.
Step 2: Buy a plain Bronto Burger.
Step 3: Return to Desmond. Reward: Social Armor
[Reveal] Walkthrough
Before we head off, do you remember where we planted that bug in the plant? That's right! We're going to talk to Desmond Caltiri. Now, he is quite an unsavory person, so you may want to cover your eyes while you do this next part.
Mm, burgers.
So, we want to leave his office and head down the road to the food .. blimp? Car? Well, the Bronto Burger fast food store.
Give Barry a little chat.
Click on the little shopping cart icon at the bottom of that chat window, and buy the Bronto Burger for 30 credits. You can tell it's the right one because the name of the item is in blue and it is on the first row, far right.
Return to Desmond with the burger. Make sure not to get the grease all over your armor!
Overview
Step 1: Go outside and eliminate 2 Protesters.
Step 2: Return to Desmond. Reward: None
Now comes the not-so-fun part. We need to head outside his office once more and confront those who stand outside with signs. Just think of us knocking them out!
When you're done, let Desmond know. And hope those two protesters are okay.
Overview
Step 1: Find Cedric Harding and eliminate him. Reward: 1120 credits; (up to) 2229 xp; Dockworker Overalls, The Brute Suit, and Experimental Nano Armor Exosuit
Ugh. I don't want to kill Cedric! Head on out of Desmond's office and just past the Bronto Burger food blimp thing.
There he is. You can have a small chat with him beforehand.
Cedric will call a Violent Protester to help him. Once you defeat them both, you will get the reward without having to return to Desmond.
I like to think I just knocked everyone out instead of killing them. Ew.
Desmond Calitri: I have a shipyard to run, do you need something?
Nanashai: Do you have any work around here?
Desmond Calitri lets out a loud laugh
Desmond Calitri: Look 'round you, kid. This is a large-scale industrial operation, freight is coming and going constantly. Sadly, my staff is full. We have no room for more grunts here.
Though I am hungry. Go grab me a Bronto Burger, and I must emphasize, a normal Bronto burger. I may be able to think of something for you to do for me by the time you get back.
Nanashai: Goodbye.
Desmond Calitri: Just go.
Mm, burgers.
So, we want to leave his office and head down the road to the food .. blimp? Car? Well, the Bronto Burger fast food store.
Give Barry a little chat.
Barry the Food Vendor: Step on up, stranger. I've got the delicious, meaty goodness that you crave.
Nanashai: Desmond Calitri sent me here for a Bronto Burger.
Barry the Food Vendor: He wants another one? Excellent! Nobody can't help but fall in love with these succulent and mouthwatering burgers.
Boss Calitri always asks for the traditional Bronto Burger. If that's the one you want, just say so.
Click on the little shopping cart icon at the bottom of that chat window, and buy the Bronto Burger for 30 credits. You can tell it's the right one because the name of the item is in blue and it is on the first row, far right.
Return to Desmond with the burger. Make sure not to get the grease all over your armor!
Desmond Calitri: I am busy, what do you want?
Nanashai: I have your Bronto Burger.
Desmond Calitri: Yes, I can smell it. Hand it over. (hand over the Bronto Burger)
Desmond Calitri: Took you long enough. I was getting ready to call in one of my Bruisers to take care of this little chore, but I think you will be able to handle it.
I hope you won't have any qualms with getting your hands dirty, as I have a mess that needs to be cleaned up.
Nanashai: What do you need help with?
Desmond Calitri: Let's get one thing straight: I don't need anyone's help for anything. But, there is a situation on my hands that needs to be dealt with. A new face like yourself will do good here.
Some of my workers are outside protesting. Something about unfair payment or my harsh work conditions. They are all lucky to have jobs here with the ICC. I need you to rough up a couple of those Protesters that are forming outside. It's bad for business, and I don't need ICC to start breathing down my neck.
Overview
Step 1: Go outside and eliminate 2 Protesters.
Step 2: Return to Desmond. Reward: None
Now comes the not-so-fun part. We need to head outside his office once more and confront those who stand outside with signs. Just think of us knocking them out!
When you're done, let Desmond know. And hope those two protesters are okay.
Desmond Calitri: I am busy, what do you want?
Nanashai: I took care of those protesters.
Desmond Calitri: Good, serves them right. They are all lucky to have a job with ICC and such a caring boss like myself. If they keep up with these protests, they'll wake up in the desert. In small pieces.
Now there's just one last thing I need from you, and then maybe I'll let you join my workforce. The organizer of these Protests, and the person putting ideas of "unions" and "fair" working conditions...I need you to shut him up.
Find that upstart, Cedric Harding. Make an example out of him, and I may count you as one of my own.
Nanashai: I'll take care of it.
Desmond Calitri: Good, then stop wasting time and take care of it already.
Overview
Step 1: Find Cedric Harding and eliminate him. Reward: 1120 credits; (up to) 2229 xp; Dockworker Overalls, The Brute Suit, and Experimental Nano Armor Exosuit
Ugh. I don't want to kill Cedric! Head on out of Desmond's office and just past the Bronto Burger food blimp thing.
There he is. You can have a small chat with him beforehand.
Cedric Harding: Hello there, here to combat the tyranny brought on by our oppressive foreman?
Nanashai: I am here to end the fighting.
Cedric Harding: Oh? That's good to hear, I think. Did Calitri send you with a message? That was easier than I thought it'd be.
Nanashai: Yes, this is easier than expected.
Cedric Harding: So that's how it is. I figured he was done sending his goons at me. We'll deal with you like we have all the rest.
Cedric will call a Violent Protester to help him. Once you defeat them both, you will get the reward without having to return to Desmond.
I like to think I just knocked everyone out instead of killing them. Ew.
⇑
13. Antonio Stacklund and Upgrading WeaponsAntonio Stacklaund
- 3443.3x834.8
Mobs found in the area as you do these missions:
- Leet (Flocks, Level 10 - 13)
- Angry Minibull (Aggro, Flocks, Level 8 - 13)
- Rollerrat (Aggro, Flocks, Level 5 - 6)
- Desert Reet (Flocks, Level 5 - 6)
[Reveal] Walkthrough
Antonio Stacklund can be found in the Marketplace
Antonio Stacklund: Hello there, welcome to Rubi-Ka! Looking for an upgrade for your weapon? With my greatest creation, the Adaptation Factory, you can improve your old, worn weapon!
Nanashai: As a matter of fact I would like to upgrade my weapon...
Antonio Stacklund: Good! What type of weapon would you like to upgrade?
You'll see a list of choices at the bottom of the NPC chat. Choose which one you are interested in, and Antonio will tell you what you need to find, along with buying an Adaptation Factory from his shop. He also sells all the starter weapons in case you want a different one or deleted yours.
NOTE: You will need to buy an Antonio Adaptation Factory for every tradeskill combination you do with it, as it will be used up in the process.
Weapon Upgrading Example:
Once you get your weapon, you can talk to Antonio again to make some armor.
Antonio Stacklund: Hello there, welcome to Rubi-Ka! Looking for an upgrade for your weapon? With my greatest creation, the Adaptation Factory, you can improve your old, worn weapon!
Nanashai: Do you only have weapons and weapon upgrades?
Antonio Stacklund: Actually, you can use the adaption factory to make other things. How about a bracer? A leather vest? Or maybe a hud device is what you are looking for?
You can make a Poison Injector Bracelet, Leather Vest, and a Range Meter.
Here, I will list the many items you need for the different weapon upgrades and what creatures you can find them on:
| Angry Minibull | |
| Waste Collector | |
| Garbage Flea, Waste Collector | |
| Waste Collector | |
| Angry Minibull | |
| Angry Minibull | |
| 32-V Docker | |
| 32-V Docker | |
| Desert Reet | |
| Rollerrat | |
| Bought from the ICC Tech Terminal by Vernon | |
| Leet |
⇑
14. Remi Gallois Remi Gallois
- 3433.9x834.8
[Reveal] Walkthrough
Now, off we go to Remi Gallois, who is in the stall next to Antonio. NOTE: This is a Subscriber only mission.
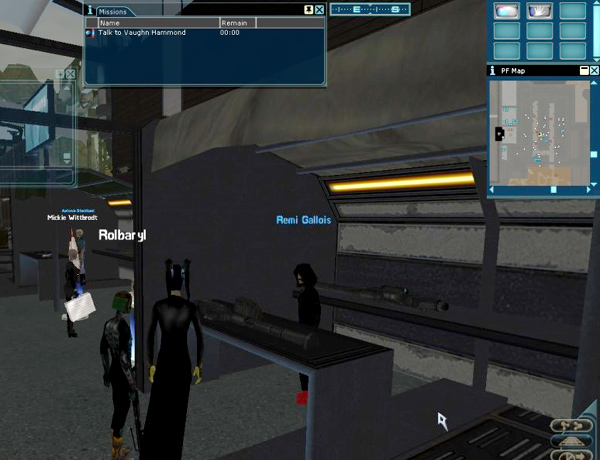
Flashing a killer smile as you approach the young man before you spreads his arms at his side, directing attention to his wares.
Remi Gallois: This is a dangerous world, friend - I'd hope you're prepared. That Omni-Tek... yokel over there believes that you can hide from your troubles behind some shiny plasteel. Personally, I prescribe to the idea that the best offense? Is a damn good offense.
Nanashai: Do you have any work for me?
Remi Gallois: I have spent some time in the lab working on new designs...
With a grunt and a loud thud Remi plops a large tube of wicked-looking hardware onto the nearby table.
Remi Gallois: I give you: The Hellfyre Rocket Launcher.
Still needs a few additional field tests before I can call it a day, which is where you come in.
Nanashai: Wait, you want me to do what now?
Remi Gallois: Don't worry, It's easy. There's a group of lowlife gangbangers out there that managed to get ahold of some serious hardware. Someone left some stray mech activation codes laying around somewhere and these a-holes got ahold of it. Been running around acting like little brats ever since.
The Hellfyre Rocket Launcher is designed to remove unwanted bipedal mechanized war machines. So, are you in?
Nanashai: I guess I could do that...
With a sharp nod he reaches down and pushes the launcher toward you across the counter-top.
Remi Gallois: Good to hear. I've uploaded some basic information on the gangbangers you're going to be taking out including where we think they're hiding out at the moment.
Woohoo! We get to play with a rocket launcher! But we should wait til we get to the area before we equip and use it, as we only have so many rockets.
Heading east (far East) until you come across a compound in the desert. Here is where we'll find the mobs we need.
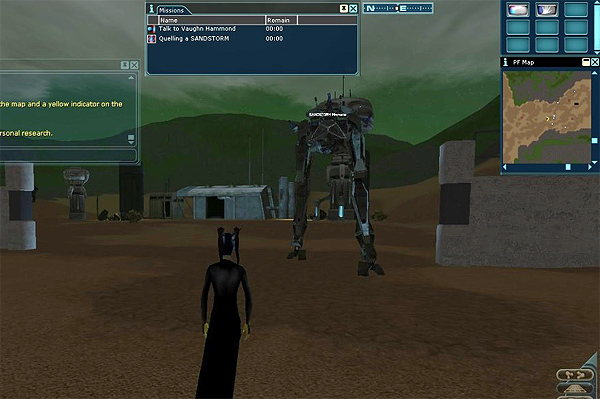
You'll now need to unequip your weapons, and equip the Experimental Hellfyre Rocket Launcher. Target a SANDSTORM Marauder (they can be killed with regular weaponry, but it just takes a while), and attack it, just like you would any other mob, except this time, you'll be shooting rockets. When done, unequip the rocket launcher and return to Remi.
Remi Gallois: You came back! How did my weapon do?
Nanashai: Your field test is complete!
Remi Gallois: I saw the explosions from here - Good stuff! I think I might have come up with a real winner this time around. Anyway, since the weapon's registered to my ID, the ICC sent over the bounty reward soon as the kills got registered. Thank you for your help!
As a reward, you'll get 4 Nano Crystals; Composite Ranged Expertise, Composite Melee Expertise, Composite Physical Special Expertise, and Composite Ranged Special Expertise, all needing Sensory Improvement and Psychological Modification at 61.
NOTE: It looks like you can keep the Experimental Hellfyre Rocket Launcher after the mission, but alas, after a minute or so it will explode in your Inventory and disappear.
⇑
15. PvP Arena - 3620.4x678.0
While heading east toward our destination, you may pass by the Arena used for Player vs. Player action.
Player vs. Player (PvP)
Rarity: Normal
Description: There are different levels of suppression gas allowing or preventing fights.
* 100% suppression gas means that no fighting is allowed in this area.
* 75% suppression gas allows for fighting monsters, but players will need a PVP Flag to be able to fight each other.
* 25% suppression gas allows opposing factions to fight each other.
* 5% suppression gas allows players who do not belong to the same organization to fight each other.
* 0% suppression gas will allow anyone to fight anyone.
* It is also possible to engage in a duel with another player. Simply target and type /duel to initiate the duel request. A player can only fight another player if the level difference allows for it.
⇑
16. The Shiny Sword and The Leet King[Reveal] Walkthrough
While you fight and loot, you might come across an object called Shiny Sword. If you do, Right Click it to get a mission. Hm, who might like shiny things ... ah, I know! The Greedy Desert Reet!
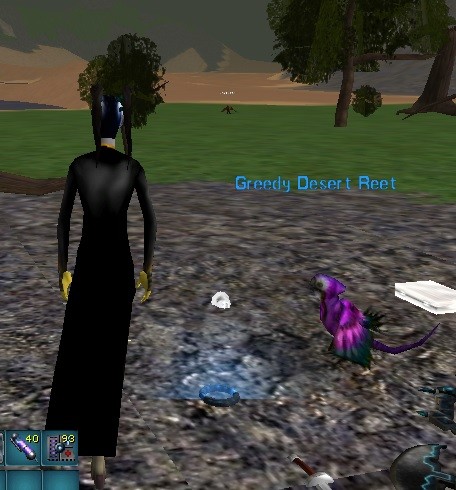
Greedy Desert Reet: Can I have ur sword?
Nanashai: What?
Greedy Desert Reet: UR SWORD!! GIVE IT!
Nanashai: Here, take my sword.
Greedy Desert Reet: WAT!??! Shiny stuff for me? Z0mg! (Hand over the Shiny Sword)
Greedy Desert Reet: Oh so SHINY!
Nanashai: You are welcome...
Greedy Desert Reet: I HAS UR SWORD!!!
You'll receive Nano Crystal (Composite Nano Expertise) which you will need Sensory Improvement and Psychological Modification at 61.
As you wander around, you might even run into the Leet King!
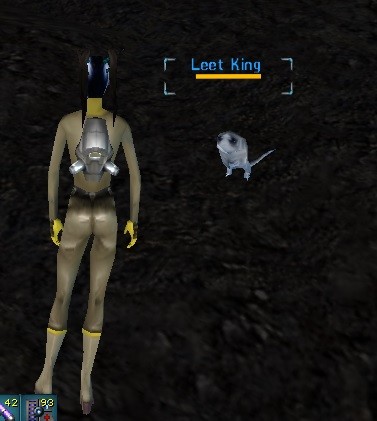
Leet King: Wat?
Nanashai: What are you?
Leet King: I r teh king!
Nanashai: But you look like... A rat..
Leet King: Silence j00! I r teh King, j00 no speek to me liek dat!
Nanashai: Sorry..
Leet King: U maekz mad nao! U needz to deserve forgivenesseses! J00 do teh j0bz and I forgievz. We has understandings?
Nanashai: What do you want me to do.... Your smallness...?
Leet King: Dewd u sux. Now I r so angreh I dun wanna speek wif u againz! Go awayz! Shoo! Leave teh king alonez!
Nanashai: Just tell me what to do to get your forgiveness, my king.
Leet King: U haz makez teh king furiousez! U has to remove teh wrath, only way to do dat is annoyz teh Greedy Desert Reet and smash his treazurez! He stolez them and maed urs king vereh angreh!
Nanashai: I'll do it..
Leet King: U slowz noob. Wai u still standeh thar? Go nao!
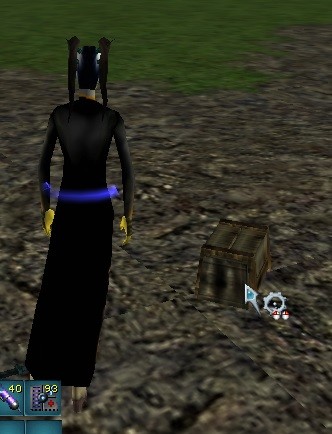
Looks like we have to go back and kill the Greedy Desert Reet (Flocks, Level 7). Once you do that, click on the Stolen Treasure and Right Click the Sledgehammer in your Inventory to break it. Now back to the King Leet.
Leet King: Wat?
Nanashai: I did it..
Leet King: Gief mah hammar backz! (Return the Sledgehammer)
Leet King: !U did gewd. Nao u hazs to fiend me a womanthing! Yus!
Nanashai: a woman... thing?
Leet King: Wat isz wrong wif u? U not many smartz. Ofc king needzz a queen. U go fiend oen for me nao.
Nanashai: Where?
Leet King: U hazs eyeseses don'tz u? Hurry I r vereh loneleh! And giev her chocolateseses and fl0warz fr0m teh kiiiing!
So, ugh that speech ... but it looks like we need to steal us some flowers and chocolates, and find the Leet King a lady friend.
First the flowers and chocolates. You'll find them on the table in the stall next to the Food Provider (across from Remy Gallois) in the Market. Just click on them both to pick them up.
Well, one would assume the Leet King wants to marry another Leet, so let's look around. A-ha! There she is, the lovely Princess Leet!
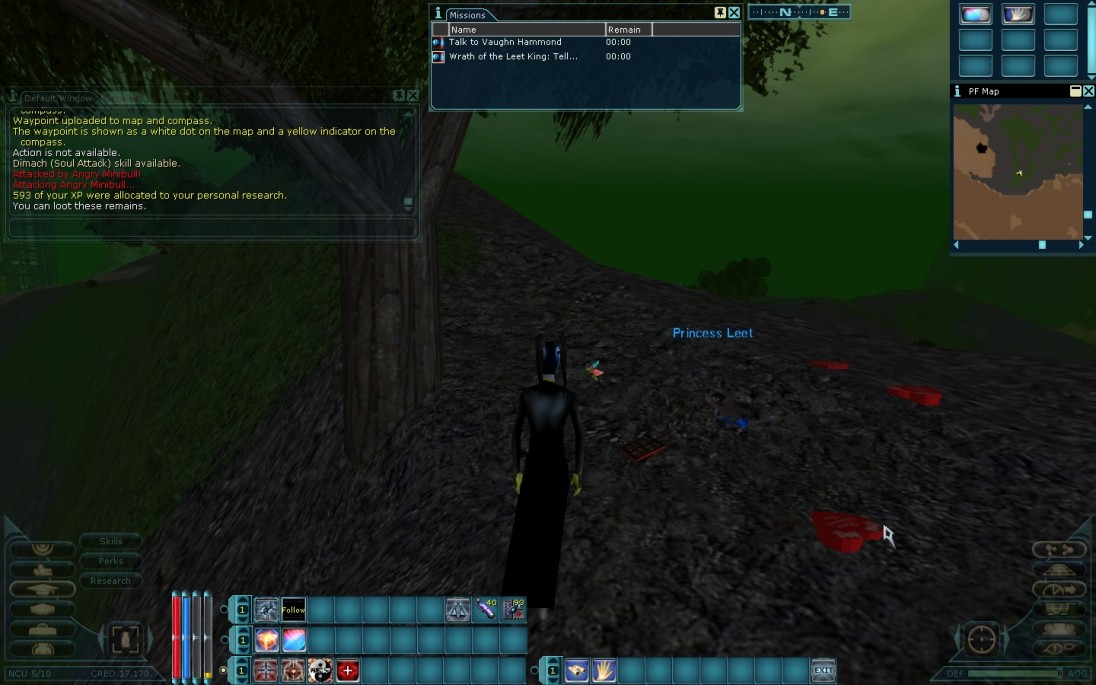
Princess Leet: I r tha princess!
Nanashai: I bring gifts from the king..
Princess Leet: Silleh humin. He iz no king, he juzt pretandz! Besidez he alwayzs bring giftzezes..
Nanashai: So I went through all this trouble for nothing...?
Princess Leet: Maybeh.. Letz me see what he sended u to giefz. (Hand over the flowers and chocolate candy)
Princess Leet: He gotz me all diz stuffz... Kewl he muszt liekz meh! I found diz junkz in teh desart, u canz has it forz urz troublez!
Nanashai: Thank you, I guess.
Princess Leet: Movez along nao u. I haz a daet!
Love is in the air, and you receive a random item dealing with biomesh clothing.
⇑
17. The Shady GuyObjectives
Step 1: Find the fancy white car in the desert.
Step 2: Use the Crowbar on the car.
Step 3: Defeat Mario Carles.
Step 4: Return to the Shady Guy. Reward: 5000 credits; (up to) 1540 xp; Kodiak Velocity IV
[Reveal] Walkthrough
And now, let's talk to a Shady Guy near the vehicle dock.
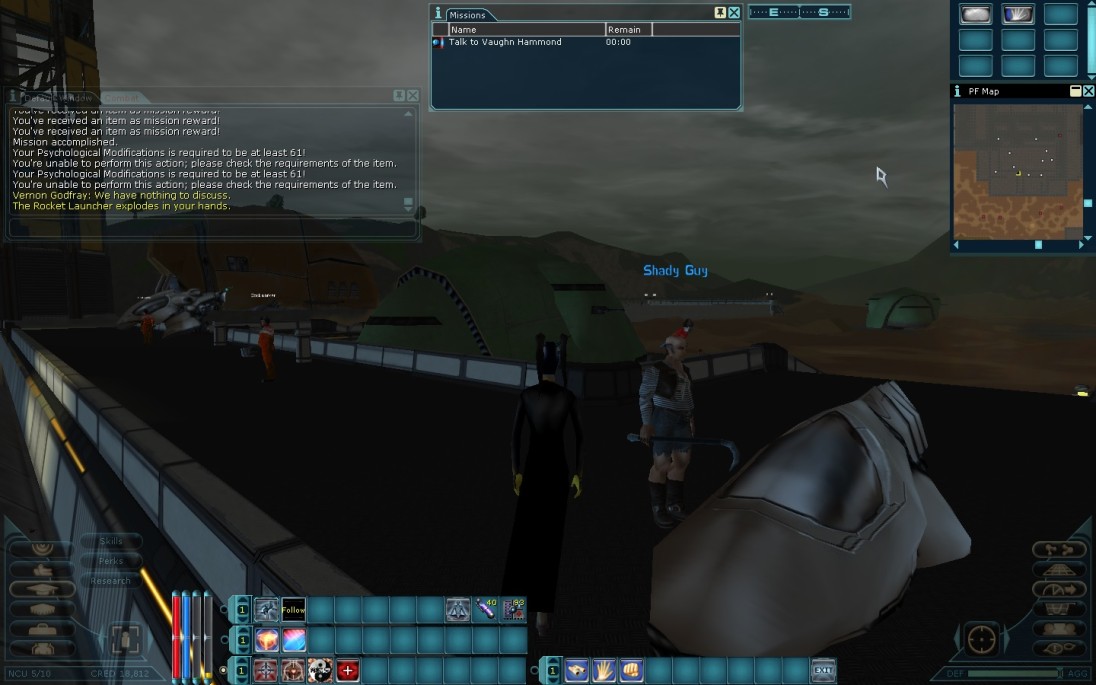
Shady Guy: Rusty piece of junk!
Nanashai: What is wrong?
Shady Guy: I used to have a nice car, but then the fancy guy stole it from me. Now I only have this piece of junk.
Nanashai: Well, at least you have a car...
Shady Guy: I sense we might benefit from collaborating. You look like a girl who knows how to take care of herself...
Nanashai: Where are you going with this?
Shady Guy: If you were to help me steal my car back, I could give you my rusty junk car here. And we would both benefit from the deal, what do you say?
Nanashai: I'm listening.
Shady Guy: Here, take this crowbar. Pretend to smash the car, I'm sure that will get his attention. Knock him out and bring me my car back.
Yeah, totally legit this is .... ah well. Too late to back out now! What we need to do is head into the desert and look for a ritzy, white vehicle floating around.
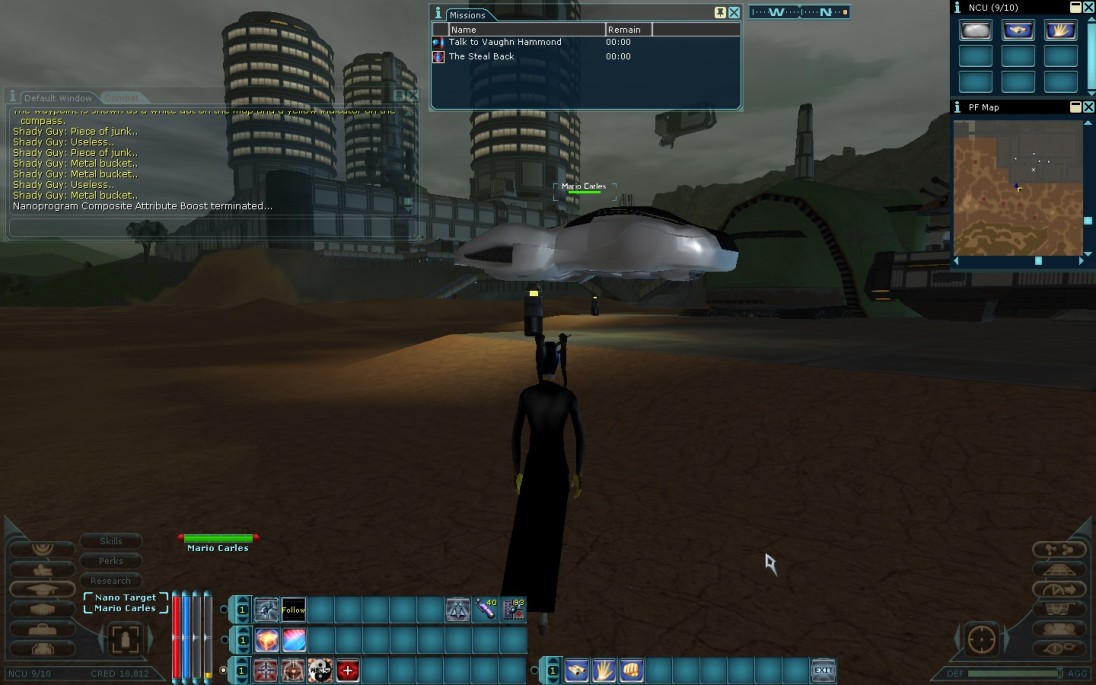
It moves quite slow, so you are able to Left Click on it, then open your Inventory and Right Click on the Crowbar. This will have Mario Carles (Level 10) jump out of the vehicle. Proceed to pummel him until defeated, and you'll receive his car (Stolen Yalmaha) ... somehow ... Let's return to the Shady Guy.
Shady Guy: Rusty piece of junk!
Nanashai: I have your vehicle.
Shady Guy: Give it to me, now! And the crowbar too! (hand over the crowbar and the Stolen Yalmaha)
Shady Guy: Nice! I finally have "my" car back. And a beauty she is.
Nanashai: Did you just tell me it wasn't your vehicle to begin with?
Shady Guy: Details... Details... You have a car now, be happy. I don't think we have much more to talk about.
You'll receive a Kodaik Velocity IV, which when used will give you the ability to summon your very own vehicle!
⇑
17. Emiel DijkmanOverview
If you head south out of Arete Landing and go pretty far into the desert area, as you approach the Alien crashed ship, you'll come across a man in a tent, Emiel Dijkman.
Step 1: Deliver the box of foodstuffs to Logistics Manager Fausto at the Bazaar. Reward: Choice of Heavy Bio Mesh OR Light Bio Mesh.
[Reveal] Walkthrough
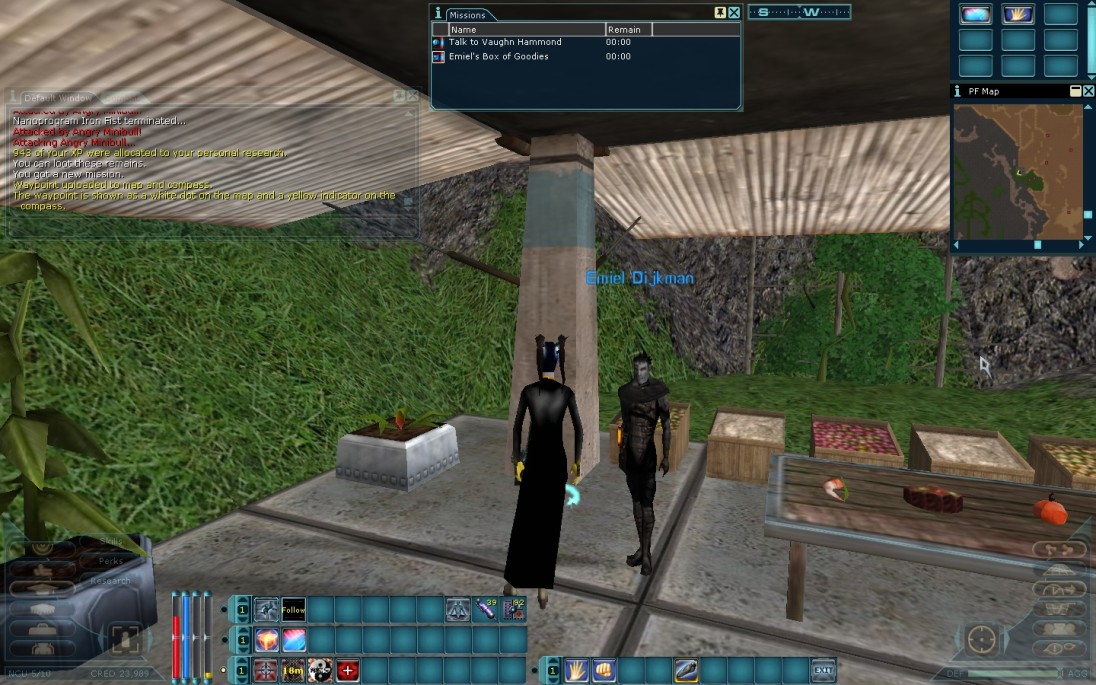
Emiel Dijkman: Hello
Nanashai: I'm looking for some honest work.
Emiel Dijkman: You have come to the right place then. I have some goodies that need delivery to the Logistics manager in the bazaar. He enjoys food as much as I do.
Emiel Smiles.
Nanashai: I'll do it.
Emiel Dijkman: Perfect, here take this box and locate Fausto Cesario in the Bazaar area and hand it to him.
Heading to where we got our profession nanos and lockpicked the merchant strongbox, you'll find Logistics Manager Fausto.
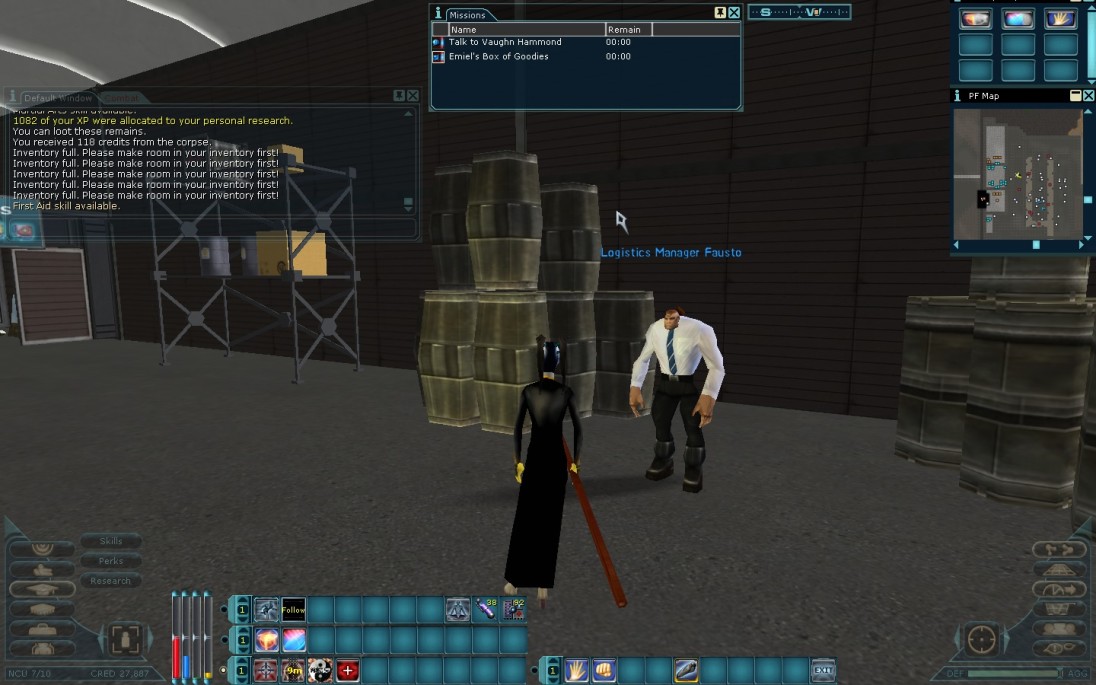
Logistics Manager Fausto: Well well, a newcommer?
Nanashai: Emiel told me to give you this box of foodstuffs.
Logistics Manager Fausto: Hand it over. (hand over Emiel's Box of Foodstuffs)
Logistics Manager Fausto: Perfect, this was just what I needed. Emiel's super tasty food. My day is saved.
Nanashai: What about a little tip for my efforts?
Logistics Manager Fausto: I found some old stuff lying around that you might be interested in. It is called a biomesh and is used for tailoring fancy clothes.
The heavy bio mesh is used for footwear, legwear and chestwear.
The light biomesh is used for backwear, handwear, headwear and armwear.
Which one would you like? (You can only choose one, so it's a personal choice)
⇑
⇑
18. The Credit CardOverview
Steal the credits. Reward: 15000 credits.
OR
Find the owner of the credit card. Reward: (up to) 2080 xp; Vacuum Packed Omni-Med Suit.
[Reveal] Walkthrough
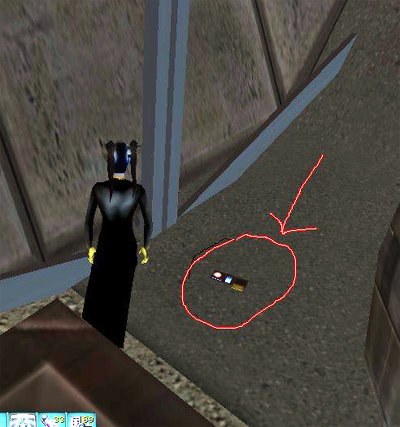
While you are down in the Underground, take the straight path to the end, and look behind some barrels. You'll find what looks to be a lost Bank of Rubi-Ka Credit Card (3448, 889) there.
When you pick it up, you are given two quests. You have to make a choice.
1) Steal the credits. If you are looking to bypass Arete Landing and get right into ICC HQ, right click on the Credit Card in your Inventory, and say Yes at the pop up. You will be given 15k Credits. You can then go straight to Vaughn Hammond and bribe him to let you leave. Or of course, you can pocket the credits.
OR
2) Find the owner of the Credit Card, Leonora Marty, pacing around in the Marketplace.
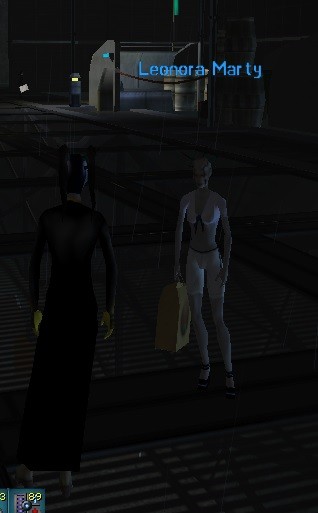
Leonora Marty: How could I be so stupid...
Oh hello there, I'm having a really bad day... What do you want?
Angelterri: I am here to make your day brighter. I have found your credit card!
Leonora Marty: Really? Hand it over! (Hand over the Credit Card)
Leonora Marty: Thank you so much. I really hope that the vendor still have the t-shirt I wanted!
Angelterri: You are welcome.
Leonora Marty: Finally I can go shopping again!
She then gives you a Vacuum Packed Omni-Med Suit.
⇑
⇑
19. The Alien ShipObjectives
Step 1: Find another player to team up with.
Step 2: Use the Nano Can: Friendly Buff on your teammate. Reward: 2520 credits; (up to) 1386 xp; 3x 8-15 NCU Memory
[Reveal] Walkthrough
If you head south past the lake in the desert, then go a bit east, you'll run into the Alien Crash Site. Make your way to the largest of the ships and enter it.
You will come across a very strange alien in the form of Karli Cappelleri.
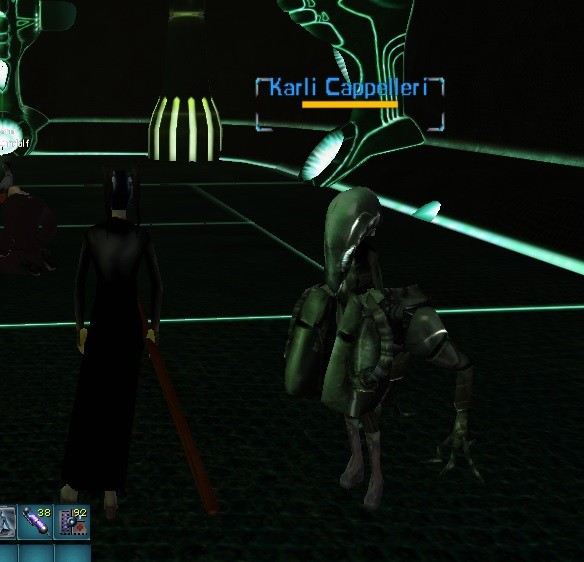
This area is going to teach you about Teams and Team Missions.
If you speak to Karli while you are solo, you can get this quest:
Karli Cappelleri: I'm a little busy here...
Angelterri: What are you doing?
Karli Cappelleri: I'm an alien spy. I find and terminate aliens... Quietly!
Angelterri: I want to fight aliens too!
Karli Cappelleri: I think you should find some friends to help you out for this one.
Angelterri: But, I don't have any friends...
Karli Cappelleri: You know we have a lookup system to find people with similar interests here on Rubi-Ka. Just open your team search interface. Or perhaps just look for someone around you that you can start a team with. Here, take this Friendly Buff Nano can and see if you can find a friend to use it on.
She then gives you a Nano Can: Friendly Buff. What you need to do is find someone to Team with, then target them. Make sure they have at least 5 NCU slots free, target your Teammate, and right-click on the can in your Inventory. This will complete the mission, give both of you a buff of +11% xp gain (lasts for ~3-4 hours), and give you 3x 8-15 NCU Memory.
Karli also gives a Team Mission. While staying in your Team (and the levels of all members are relatively close), talk to her again.
Karli Cappelleri: I'm a little busy here...
Angelterri: What are you doing?
Karli Cappelleri: I'm an alien spy. I find and terminate aliens... Quietly!
Angelterri: We are ready to help you out.
Karli Cappelleri: Enter the crashed ship and do your killing there. Try not to blow my cover.
The mission always entails finding and killing an Alien Spider - Zix, which is found in the room with the Alien General. The rooms are random, and the aliens in the ship are from Levels 11 - 13 or so.
The Aliens you encounter inside and outside the ship are:
- Alien Spider - Zix (Level 8-13)
- Scout Jaax'Sinuh (Level 11-13)
- Specialist - Cha-Heru (Level 11-13)
- Alien General (Level ?)
NOTE: Sadly, while I was rearranging this guide, I lost the name of the original player who helped me through the Alien Ship. Just know I really really appreciated the help!
⇑
20. Choosing a Faction[Reveal] Walkthrough
Well, you got your ID card, finished all the quests in the area (or as much as you wanted to) and you're ready to leave Arete Landing.
There is one more thing you can do before you leave. I put this choice here since it fit better in the flow of things. Do you want to stay Neutral, join the Clan, or join Omni-Tek?
Clans
Rarity: Normal
Description: Primary goals for the Clans are freedom and spiritual gain. The clans are opposed what Omni-Tek stands for and fight to free Rubi-Ka of its oppressive rule. The Clans are stationed out of the rebel part of Rubi-Ka, on the dry side of the planet.
Main Cities:
* Tir
* Old Athens
* West Athens
* Avalon
* Bliss
Omni-Tek
Rarity: Normal
Description: Omni-Tek is a hyper-corporation with affiliates all over the galaxy. It has a large presence on Rubi-Ka to mine for the rare mineral commonly known as Notum.
Omni-Tek strives for profit and will let nothing stand in its way. As a new citizen of Rubi-Ka you are expected to become an Omni-Tek employee. In the Omni-Tek family you gain material benefits and power.
The primary goal for Omni-Tek is material gain.
Main Cities:
* Omni-1 (HQ, Trade, Entertainment Districts)
* Rome (Red, Blue, Green Districts)
* Galway Castle
* Lush Fields
Since you can only choose one side to be on, it is an important decision. NOTE: You can switch sides later on by purchasing the appropriate application form, but there is a lock out timer each time you use an application form that will prevent you from switching sides at will.
The duration of the lock out depends on your level. It is 40 seconds if you are level 1 but will be 168 hours if you are level 200.
Let's talk to Clan Guard Elina Jones.
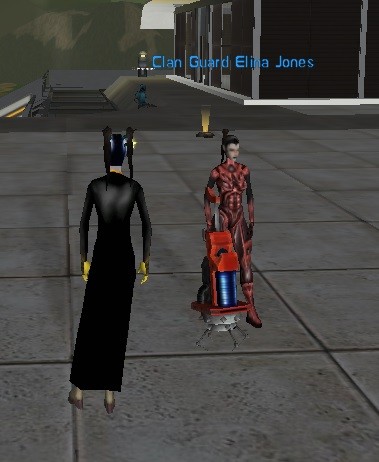
Clan Guard Elina Jones: Hello Nanashai. You should join the freedom fighters!
Nanashai: What are you doing here?
Clan Guard Elina Jones: We have to make our stand here. Everyone that arrives on Rubi-ka deserves to know what Omni-Tek really does to this planet!
Nanashai: I agree with you, Omni-Tek needs to pay...
Clan Guard Elina Jones: Join the clans then! We fight for freedom and we certainly make Omni-Tek pay!
Nanashai: You are right, maybe I should join the clans...
Clan Guard Elina Jones: Great! I know a guy you might want to talk to. Ericson is always looking for young recruits.
Field Commander Ericson isn't that far away. Just head north through Omni-Tek building, and Ericson is standing at the tables.
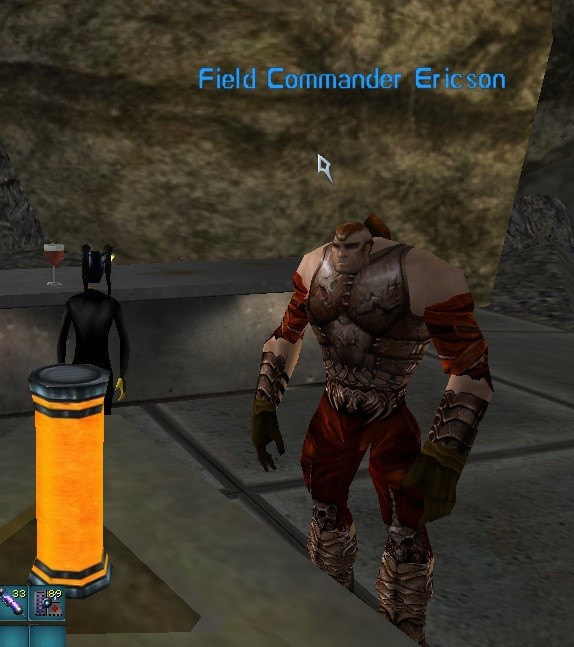
Field Commander Ericson: And yet another able-bodied recruit blows in from the sandy wastes.
Are you here to help the cause?
Nanashai: Yes, Elina Jones sent me.
Field Commander Ericson: She is a fine woman, Elina. Did she tell you anything about the Clans?
Nanashai: Enough for me to know I should be on your side!
Field Commander Ericson: I have a small task for you, if you are interested..
Nanashai: What did you have in mind?
Field Commander Ericson: In this facility, you'll find some Omni-Tek lackies and I would like you to place this...device...on the vehicle that these Omni-Tek vermin crawled out of.
The device's true purpose does not matter, I just need you to locate their vehicle and use the device on it.
It doesn't get much simpler than that, right?
Nanashai: Ok, I'll do it.
Field Commander Ericson: Good, I knew you'd want a piece of the action. Here's the device, now go and tag that Omni-Tek vehicle.
Time to place a ... thing ... on Officer Milne's cruiser. Head straight south and down a small ramp to the desert and turn right. You'll see the cruiser there. Left click on it, then pick up the Unknown Device from your Inventory and click on the cruiser (once again, finiky hitbox heh). An Omni-Tek Patrol will appear, but just ignore it and head back to Ericson.
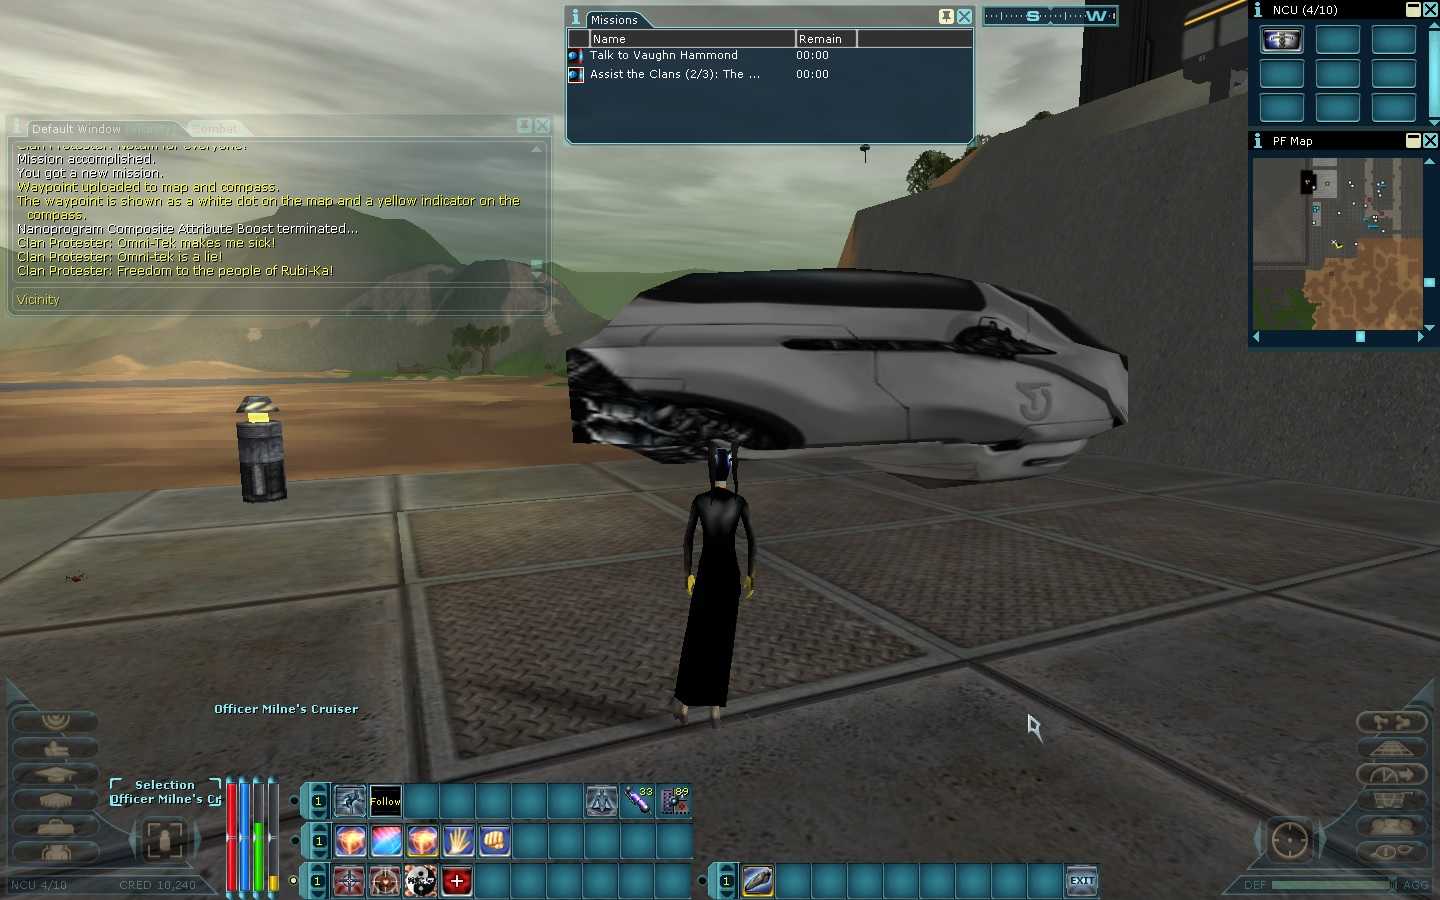
Field Commander Ericson: So you've come back. I trust the mission was a success?
Nanashai: I did it. Just as you told me to.
Field Commander Ericson: Good job, then there is nothing further that we will need to speak on the subject.
You should become a clanner, here take this application form and a token of my gratitude.
You will receive four items; Clan Mission Token, Joint Clans Shoulderpad x2, and a Low Level Clans Application Form. Right clicking on the Application form will ask if you are sure to 'join' the Clan. Say yes, and it will become a Clan Merits - Basic Board. NOTE: You can Right Click it again to make it a Clan Advancement - Basic Board, but outside of stat change between the two, I'm not sure what else is a difference, or if Froobs can make it that item. Also, you'll want to Right Click on the Clan Mission Token to add it to your total.
Now as part of either Omni-Tek or the Clan, you can get upgrades for your Newcomer Armor (bought at Sarah Greene's Armor stall).
Clan Equipment Vendor: Hello my friend!
I see you're one of us now... the noble freedom fighters of Rubi-Ka... the Clans!
Being a member of the Clans is something to be proud of--knowing you are fighting every day for justice and freedom on this beautiful dusty-red planet, Rubi-Ka.
And I even have armor upgrades and new equipment which can help you in your cause!
Nanashai: Armor upgrades?
Clan Equipment Vendor: It's great armor, only wearable by freedom fighting Clans!
All you need is some Newcomer's Armor to upgrade.
Nanashai: I've got some Newcomer's Armor. How do I upgrade it?
Clan Equipment Vendor: Check out my shop inventory.
Click on the shopping basket to open the shop window.
Clan Equipment Vendor: Look for the Joint Clans Badge in the shop inventory.
You'll want to buy one Joint Clans Badge for each piece of Newcomer's Armor you want to upgrade.
To upgrade, first make sure you're not wearing your armor, then attach a Joint Clans Badge to an armor piece.
This will start a chemical reaction which will change the molecular structure of the armor - it will become Joint Clans Newcomer's Armor.
Nanashai: Appreciate the help, thanks a lot.
Clan Equipment Vendor: Absolutely! I'm always happy to help a fellow Clansperson!
So, get yourself a set of Newcomer's Armor (Chest, Hands, Boots, Legs, and 2 Sleeves - there is no Head piece, though you can buy the Shades off your respective Equipment Vendor). NOTE: The Badges do not work on Sundance armor, the armor from the Shadowlands, so can't upgrade that. You'll want to put the Badge in the Source, and the Newcomer Armor piece (unequipped) in the Target, so get the upgraded armor.
NOTE: You can upgrade your Faction Newcomer Armor by Right Clicking on it after you take it off. Each click give 1 QL point. So it will level with you up to QL 50 (?). Just make sure not to accidentally have your armor outlevel you!
Here is Nanashai is full Clan armor with the shades.
Now let us check out the Omni-Tek side. For this, we need to find Omni AF Officer Milne in what I like to call the 'white kiss tent'.
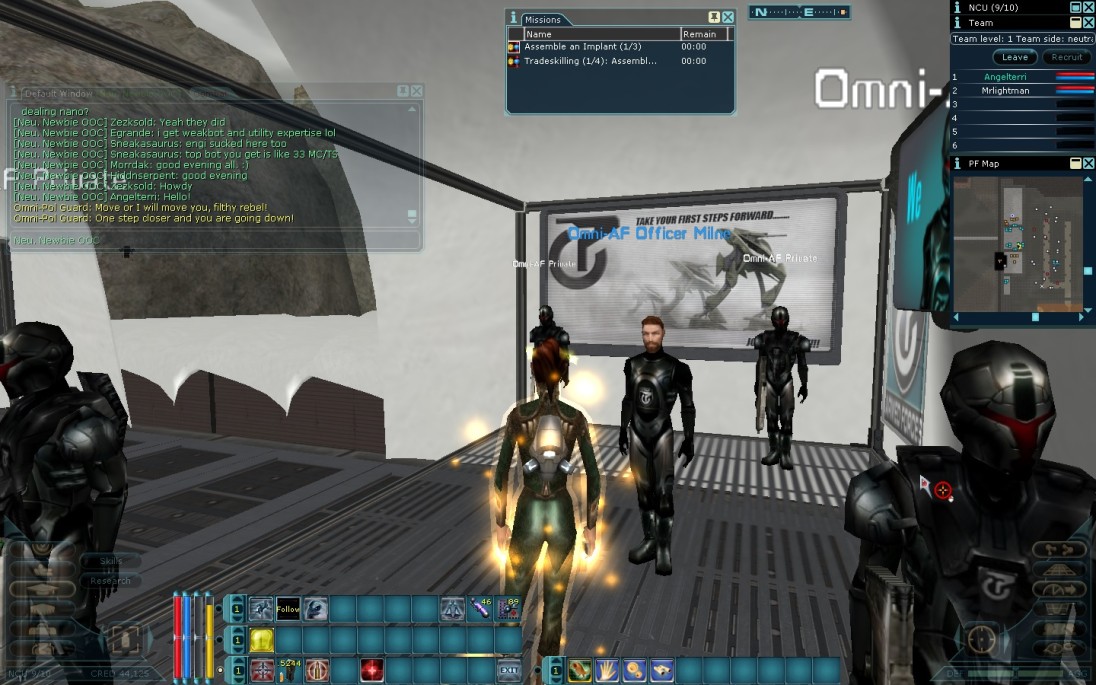
Omni-AF Officer Milne: Stand up straight and look me in the eye. You are addressing a superior officer.
Omni-Tek is recruiting. You, a new citizen on this planet, must embrace the Omni-Tek mantle and guard it with your life, as there are those who wish to see it destroyed.
Angelterri: Is Omni-Tek recruiting?
Omni-AF Officer Milne: That is correct, but we won't take just anyone. You need to have the strength to execute your corporate duties, no matter how big or small.
If you are interested, I may have a chore for you.
Angelterri: What is it you want done?
Omni-AF Officer Milne: It's quite simple, really. The biggest bonehead around here, Henri, has crossed the line for the last time. He needs to be taken care of, and by that I mean prison time.
Angelterri: I will do it.
Omni-AF Officer Milne: Good to hear. Tell one of my privates to help you before you arrest Henri. No private will ask questions if you show him the OTAF Official Notice I gave you. However, they are not very patient..
That is all. You are dismissed.
You will be given the OTAF Official Notice which you need to 'give' to one of the Privates near you. Target a Private and right click the OTAF Official Notice in your Inventory. He will then follow you to find Vanguard Henri Zure (he hang out between the tent and the small bar to the north. The Private is impatient, so don't dally!
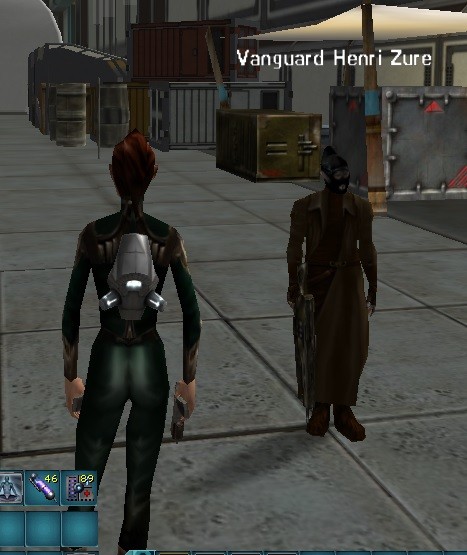
All you need to do is bring the Omni Private close enough to Henri for a scripted event to occur when Henri gets arrested. Once done, return to Milne.
Omni-AF Officer Milne: Welcome back.
Angelterri: I did what you asked.
Omni-AF Officer Milne: That is good to hear. You should send in your Omni-Tek application form, no need to sit on the fence.
As payment, here is a token of my gratitude, but it won't do you any good unless you make it official.
Just like if you joined the Clan, you will receive a Low Level Omni-Tek Application Form (right click to sign it and select Yes), an Omni-Tek Mission Token, and 2x Omni-Tek Shoulder Pads. You'll also find the Omni Trans Equipment Vendor that sells the Omni Badges to upgrade your Newbie Armor just north of Milne.
Here's my character, Angelterri in the full Omni-Tek Newcomer's Armor.
⇑
21. Janos - A Special DeliveryOverview
Step 1: Get the package from Janos.
Step 2: Leave Arete Landing for Andromeda
Step 3: Enter the Holo Deck tower and take the telepad.
Step 4: Talk to RALPH. Reward: credits; (up to) 11266 xp; commendations and potential tokens
[Reveal] Walkthrough
NOTE: This mission has no timer and can be pulled at the start of your Arete adventure or when you decide to leave. This mission requires you to leave Arete Landing to complete, so make sure you have done everything you want to here as you can't go back.
When you hit level 5, if you have not already grabbed this mission, it's a good time to head back to the starting point of Arete Landing. Why? Because the ship nearby has a mission inside of it!
Head inside by stepping on the pulsing blue circle and head to the back of the ship. There you will find Janos.
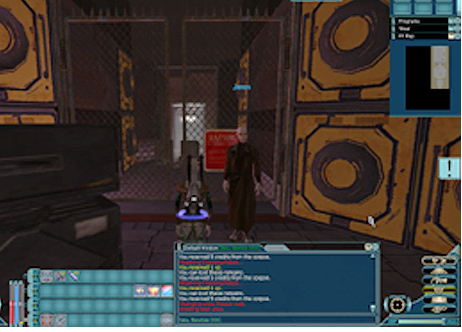
Janos in the ship at Arete start
Talk to him and Janos will ask if you're heading to ICC Headquarters. He wants you to deliver a package to "the robot butler at the desk in the tallest tower", and that will be that. Once you accept his request you will be given a sealed parcel with "Arbiter Vincenzo Palmiero" as the designated recipient.
It has the following note:
Leave with blue android. Nobody else.
When you are all done in Arete Landing, leaving Arete finds you in the Arrival Hall at ICC Headquarters in Andromeda. At this point, you can finish Jano's mission. Let's go find that 'tallest tower'.
When exiting the Arrival Hall, turn to your right. There you will see a very tall tower with a ticker saying Holo Deck.
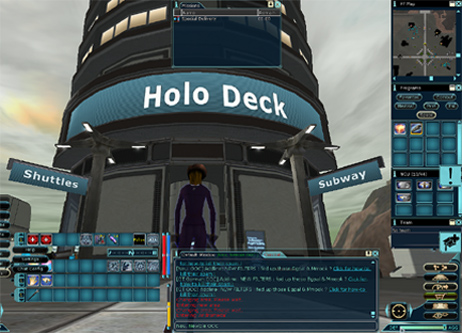
Walk into there and take the teleporter pad behind the reception desk.
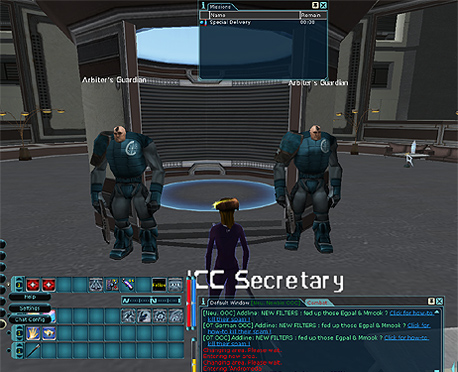
Turn slightly to your right and head towards the blue robot named RALPH behind a desk.
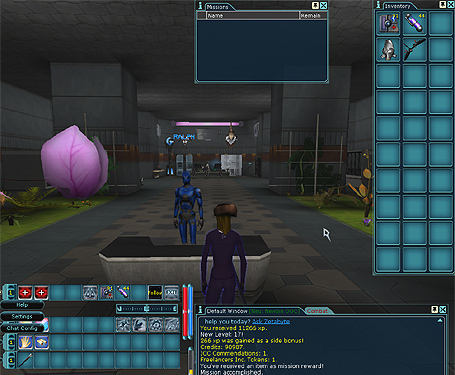
Talking to "The robot butler", you clearly see why he and Janos know each other. Both are down to business and less than informative. After some prodding, he gives you a short rundown of what's going on in the Holo Deck, and who he is.
Interesting stuff, but we really should hand over this package we are carrying!
Tell Ralph you have a delivery. Though he's not expecting a delivery he will ask you to turn over the object in question by trading him the package. Once he scans it and finds it acceptable, he assures it will be safely delivered, and may offer you a bounty for your help.
Goodness, that's a lot for that bounty! Might even get you a level.
Notes: Some reports have been made that the reward for this quest may be based on various factors, including levels over 10. This has not been verified at this time.
⇑
MISCELLANEOUS⇑
22. Vending Terminals and NPC Shops[Reveal] Walkthrough
Vending Terminals and Shops
- Ammunition: Pretty explanitory. It sells different ammo that goes in guns you use. To find out if your weapon uses ammo, you need to look at it. Here's an example. With this weapon, it uses Shotgun Shells. Now you don't reload the weapon physically. What you do is buy the ammo, then place it in your main Inventory window. As you fight, you will automatically reload your weapon when necessary.
Old OT MPS-00 Police Shotgun
Ammo: 1/36 ~ Number of ammo in the gun/total ammo it holds
Rarity: Unknown
Quality level: 5
Requirements:
Wield:
On Self:
Burst from 17 and
Shotgun from 23
Ammo type: Shotgun Shells ~ Ammo type
Damage: 2-24(28)
Dps: 0.5-5.5(6.4)
Speed:
Attack 2.49s
Recharge 2.50s
Equip delay: 5.50s
Initiative: Ranged Weapons Initiative
Location: RightHand
Range: 12m
Special: Burst
Max beneficial skill: 77
Attack skills: Shotgun 100%
Defence skills: Duck-Exp 100%
Damage type: Imp/Proj AC
Description:
This old MPS-00 is a simple Shotgun capable of firing bursts. Range is pretty poor, but firepower is pretty high.
- Junk Shop: Outside of carrying an item to wear and the tradeskill items for the Personalized Basic Robot Brain, you can find items to help make AI armor.items (but due to the prices of the items, it isn't worth it). You can also find the Sheet of Curved Carbonum Plating to make Carbonum Armor.
- Barry the Food Vendor: He sells food and drink. That's pretty much it, though one of the food (Bronto Burger) is used in a mission.
- Furniture Merchant: Sells different small furniture items, but since we don't own an apartment yet, not worth spending the money on anything.
- Neutral Clothing Salesman: Sells different social clothing, like shirts and pants. Want to show off your Social wear? Hit F10 > GUI > Equipment Window > check Enable Social Tab and Show Social Tab Only. You can also toggle if you want your headgear visible or not.
- Tailor: Outside of also selling social clothing, she can do measurements for Jobe Armor fitting. Though since that's a while away, not worth having the items in your inventory.
- Sarah Greene: This lady sells the HSR sketches for the Carbonum Armor, as well as Newcomer Armor used to upgrade with faction badges, and Sundance Armor.
- Secondhand Peddler: This one is interesting. Not only does she sell a few things like armor, weapons, Aggression Enhancers and an Emergency Defense Shield Neutralizer, she also gives tutorials on the items as well as about AC and weapons. So do check her out if you want to learn more (since it is a lot of information).
- Food Provider: Another NPC that sells food and drink.
- Antonio Stacklund: The NPC you go to for Antonio's Adaptation Factory, he also sells the basic starter weapons in case you want to try a new weapon or dual-wield something.
- Martial Artist: This terminal sells the special attacks for the Martial Artist profession.
- Remi Gallois: He sells various weapons and ammo.
- Cluster and Implant: Each Cluster Terminal sells differert ones (Shiny, Bright, Faded) and the Implant Terminal sells the basic, empty Implants.
- Pharmacy: This terminal sells stims, rechargers, treatment kits, implant disassembly units, and portable surgery clinics.
- ICC Tech Supplies: Where you go to get a Vacuum Packed Lock Pick, you can also find Night Vision Goggles and a Mission Key Duplicator.
⇑
23. Some Strange Items You Can Loot[Reveal] Walkthrough
- Find something like Instruction Disc (Shadow Filter)? You use them to create Nanocrystals.
- The Alien Invasion expansion brought in quests to make Social clothes, so if you get anything like Light Bio Mesh, you can read how to make things on this guide.
- While looting, you might find some Rings of Power. If you combine the Ring of Power - Melee (Source) and Ring of Power - Projectiles (Target) and have Quantum FT at 36, you can make a Ring of Power - Kinetic. You can find more combinations here.
- Fighting dyna mobs, you might have come across something called Hologram PD: Mossy Rock. Well they are items needed for Agents to make different Hologram Projectors.
- Find a Robotic Self-Preservation System? Seems they are used to make a Solar Powered Tinker Pistol for Engineers.
Last updated on 05.12.2023 by Cariadast
Map of Arete courtesy of Bitnykk and CODE Dragon Noir
Info for Shoulderpad parts provided by Medcure
Written by AngelTee (Terri19047 on AoFroobs)
Originally Transcribed by Llie
Do you have questions about this article or found an error? 20 comment(s) - Click here to view them!
Map of Arete courtesy of Bitnykk and CODE Dragon Noir
Info for Shoulderpad parts provided by Medcure
Written by AngelTee (Terri19047 on AoFroobs)
Originally Transcribed by Llie
Do you have questions about this article or found an error? 20 comment(s) - Click here to view them!
